

Disclaimer - this How To is meant to describe my experience and perhaps provide helpful information to people who feel that they are competent to dive into the ACC system on their cars. Obviously, I cannot be responsible for any damage or injuries (both real possibilities) that may result from using the information provided here. It's always wise to have another adult nearby, and stop if you feel like you're over your head. Reader beware!
Yesterday, with some advice from turbosupra and geeves (see this thread), I removed and oiled up the ACC blower motor in my 2004 Linear. Some people here have reported that the bearings and shaft can rust up and seize. I've had a slightly different issue - every once in a while the motor will stop running. It wasn't obviously seized, and it's only happened three times in the past year - almost always associated with washing the car, for some reason. This suggests an electronic glitch, but I wanted to rule out actual mechanical issues so I took the thing apart and oiled up.
All the action takes place on the (US Spec) passenger side of the car. I'm not sure whether the blower motor is behind the steering wheel or the glove box if you drive on the right side of the road (UK/Singapore/AUS/Japan folks let me know and I'll make an edit). The only tools you'll need are a set of smaller sized torx screw drivers (or bits, but I think screwdrivers are easier).
Step 1 - Remove the glove compartment. There are 5 torx screws. Two underneath on both lower corners. Two are visible in the upper corners when you open up the glovebox door. There's a fifth one inside on the back wall of the glovebox. Slide the glove box out slowly - you'll need to unplug the wires to the light (on the left side). In the first picture you can also see the hose (red arrow) that keeps the glove compartment cool (an option on some of our cars). It just pulls off of the glove box.
Step 2 - Remove the kick panel on the left side of the footwell, there's a single screw under a little plastic cover to the left of the passenger seat. Basically pull the whole panel down and out. Also, there's a flat plastic trim piece right above the passenger's feet, held on by two screws. One waaay off to the left, another in the center, anchored to the fan housing. The footwell light is attached to this trim panel, it just pops out.
Now the pleasant part of the job is over! You can see the fan housing in the image below, the large, black drum with the yellow sticker!
![Image]()
Step 3 - First remove the screw that holds the black air duct to the bottom of the drum. It's attached by a single screw. I followed Turbosupra's advice and bent it out of the way, it bends down and to the back easily. It will kink, but seems to snap back OK. Look at the picture below for orientation purposes. In this picture the fan housing has already been removed 'cause I couldn't get a good shot of the duct with it in place - but in real life you need to unscrew the duct before you have any chance of liberating the fan housing.
![Image]()
Step 4 - you have several screws to remove, plan to spend a half hour on your back while your blood pressure creeps up. The little tabs in the picture below show the ~6 positions for screws. The hardest three will be the two that are close to the center console, and the one that's way up front by the firewall.
![Image]()
Step 5 You're almost there! Once all the screws are removed, you can disconnect the power cable which is to the right of the unit. It seems to be held on by a little plastic clip. The fan unit is still held in place by some plastic tabs at this point. These are easy enough to see and figure out. I did snap one off, but I think these are only there to make assembly easier, they aren't vital once the screws are back in place. Space is tight, but basically pull the unit down and back while rotating it slightly. It's not the hardest thing in the world to do, but it is a bit tricky.
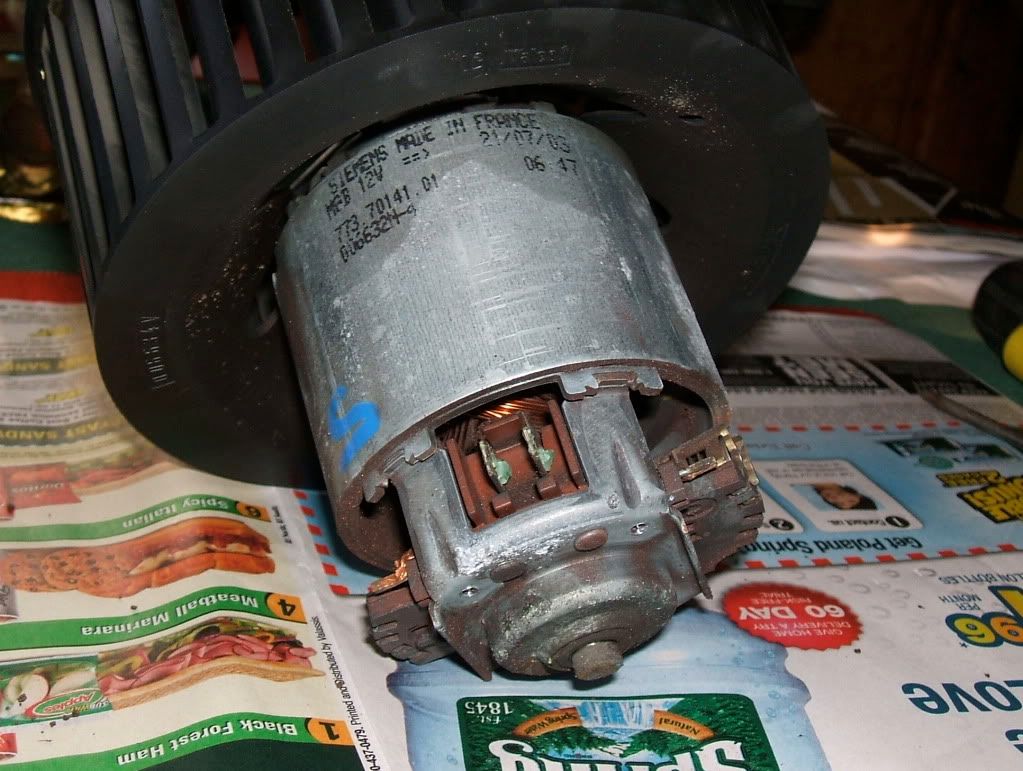
Step 5 It's liberated!!! - you may now remain upright for the next half our or so . To get the motor out of the housing, you need to first remove the electronic control unit (the thing with the aluminum heat sink) from the bottom of the unit. Just two screws, then pull it away from the center of the motor. As you can see in the picture, the contacts in mine were sort of corroded. There was some dried electrical grease, but lots of greenish corrosion looking stuff, too. I used some emory paper and some contact cleaner spray to tidy things up, then I put on some fresh dielectric grease.
![Image]()
Step 6 - Remove the motor from the housing. The motor itself is held in place by three little torx screws on the bottom of the housing. Once these are unscrewed, just pull gently on the squirrel-cage blower and the motor will slide out. You might get some resistance from the rubber supports, but it's pretty easy.
The bottom of the motor was a bit corroded, so I cleaned up the contacts, and then put some motor oil on the bearing on the bottom. I let it sit upside down for a half hour to give it a chance to soak in (not sure this helped...). I then used a q-tip to get some oil on the upper bearing, beneath the fan.
![Image]()
Step 5 - Assembly really is the reversal of removal here - one trick - I used scotch tape to keep the torx screws on the screwdriver for the harder to reach holes.
Verdict - I don't know. I didn't do any real damage, and things are working fine, I drove around for an hour today with no issues. My problem was random and occasional, so I won't know for sure whether this worked for a while. If not, I'll just follow the same steps above and replace the control unit or the motor next time. However the corrosion I found on the controller contacts does make me suspect that this was the source of my occasional problem.
Yesterday, with some advice from turbosupra and geeves (see this thread), I removed and oiled up the ACC blower motor in my 2004 Linear. Some people here have reported that the bearings and shaft can rust up and seize. I've had a slightly different issue - every once in a while the motor will stop running. It wasn't obviously seized, and it's only happened three times in the past year - almost always associated with washing the car, for some reason. This suggests an electronic glitch, but I wanted to rule out actual mechanical issues so I took the thing apart and oiled up.
All the action takes place on the (US Spec) passenger side of the car. I'm not sure whether the blower motor is behind the steering wheel or the glove box if you drive on the right side of the road (UK/Singapore/AUS/Japan folks let me know and I'll make an edit). The only tools you'll need are a set of smaller sized torx screw drivers (or bits, but I think screwdrivers are easier).
Step 1 - Remove the glove compartment. There are 5 torx screws. Two underneath on both lower corners. Two are visible in the upper corners when you open up the glovebox door. There's a fifth one inside on the back wall of the glovebox. Slide the glove box out slowly - you'll need to unplug the wires to the light (on the left side). In the first picture you can also see the hose (red arrow) that keeps the glove compartment cool (an option on some of our cars). It just pulls off of the glove box.
Step 2 - Remove the kick panel on the left side of the footwell, there's a single screw under a little plastic cover to the left of the passenger seat. Basically pull the whole panel down and out. Also, there's a flat plastic trim piece right above the passenger's feet, held on by two screws. One waaay off to the left, another in the center, anchored to the fan housing. The footwell light is attached to this trim panel, it just pops out.
Now the pleasant part of the job is over! You can see the fan housing in the image below, the large, black drum with the yellow sticker!
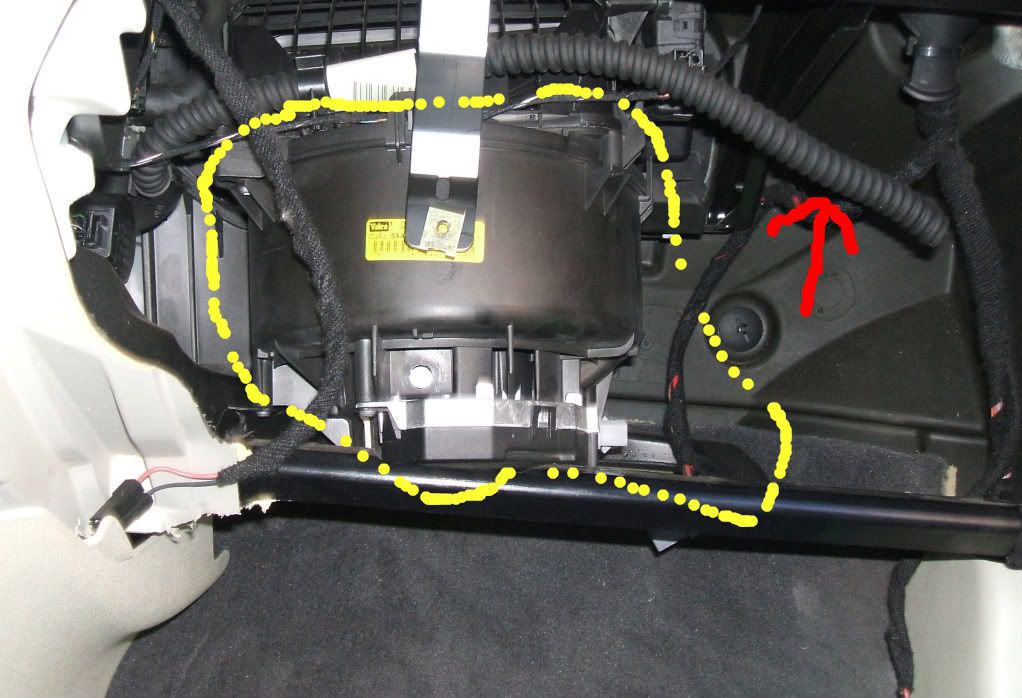
Step 3 - First remove the screw that holds the black air duct to the bottom of the drum. It's attached by a single screw. I followed Turbosupra's advice and bent it out of the way, it bends down and to the back easily. It will kink, but seems to snap back OK. Look at the picture below for orientation purposes. In this picture the fan housing has already been removed 'cause I couldn't get a good shot of the duct with it in place - but in real life you need to unscrew the duct before you have any chance of liberating the fan housing.
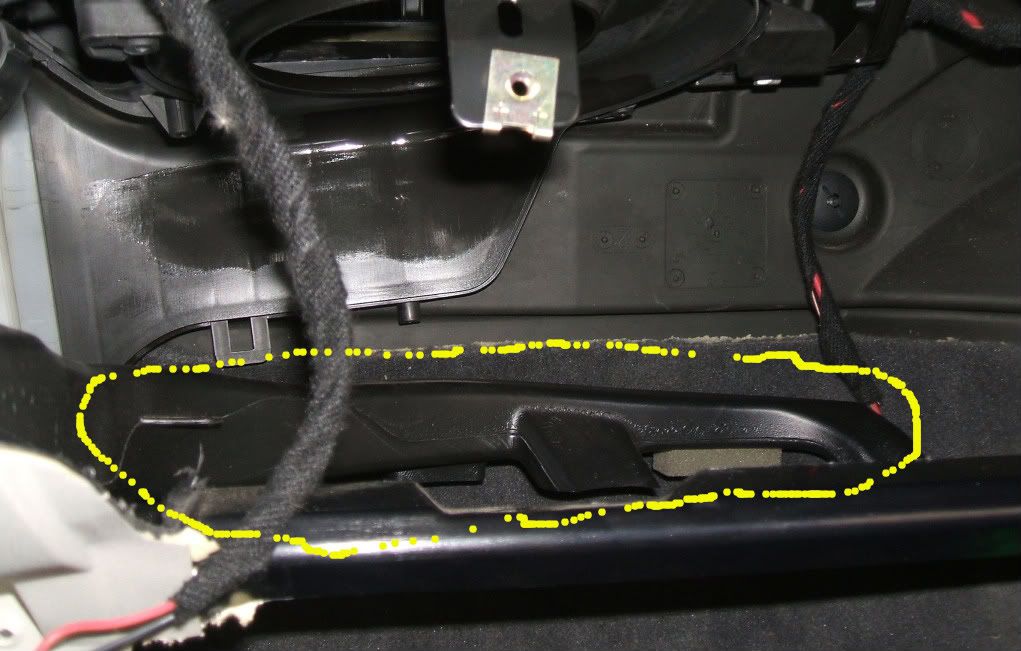
Step 4 - you have several screws to remove, plan to spend a half hour on your back while your blood pressure creeps up. The little tabs in the picture below show the ~6 positions for screws. The hardest three will be the two that are close to the center console, and the one that's way up front by the firewall.

Step 5 You're almost there!
Once all the screws are removed, you can disconnect the power cable which is to the right of the unit. It seems to be held on by a little plastic clip. The fan unit is still held in place by some plastic tabs at this point. These are easy enough to see and figure out. I did snap one off, but I think these are only there to make assembly easier, they aren't vital once the screws are back in place. Space is tight, but basically pull the unit down and back while rotating it slightly. It's not the hardest thing in the world to do, but it is a bit tricky. Step 5 It's liberated!!! - you may now remain upright for the next half our or so
. To get the motor out of the housing, you need to first remove the electronic control unit (the thing with the aluminum heat sink) from the bottom of the unit. Just two screws, then pull it away from the center of the motor. As you can see in the picture, the contacts in mine were sort of corroded. There was some dried electrical grease, but lots of greenish corrosion looking stuff, too. I used some emory paper and some contact cleaner spray to tidy things up, then I put on some fresh dielectric grease. 
Step 6 - Remove the motor from the housing. The motor itself is held in place by three little torx screws on the bottom of the housing. Once these are unscrewed, just pull gently on the squirrel-cage blower and the motor will slide out. You might get some resistance from the rubber supports, but it's pretty easy.
The bottom of the motor was a bit corroded, so I cleaned up the contacts, and then put some motor oil on the bearing on the bottom. I let it sit upside down for a half hour to give it a chance to soak in (not sure this helped...). I then used a q-tip to get some oil on the upper bearing, beneath the fan.
Step 5 - Assembly really is the reversal of removal here - one trick - I used scotch tape to keep the torx screws on the screwdriver for the harder to reach holes.
Verdict - I don't know. I didn't do any real damage, and things are working fine, I drove around for an hour today with no issues. My problem was random and occasional, so I won't know for sure whether this worked for a while. If not, I'll just follow the same steps above and replace the control unit or the motor next time. However the corrosion I found on the controller contacts does make me suspect that this was the source of my occasional problem.
![IMG_0197[1].jpg](/d2/attachments/47/47981-7c715a5089bc74ba3edd0aa4fe3ed6ef.jpg)


