

First of all, most of the information contained herein is nothing more than a culmination of a host of other threads and my own experience. I cannot say enough about the posters within the other threads because they are clearly more knowledgable than I, and definitely helpful. I would lobby the reader use their help wherever possible and wherever I have failed to be clear here. I would also lobby all readers to add any relevant information and correct any errors and/or confusions I have have introduced.
I started an earlier thread here: http://www.saabcentral.com/forums/showthread.php?t=116993 because I'd not yet changed a fuel pump on a Saab and needed help. To the credit of this board, such help was supplied aplenty and with unmatched courtesy. With that said, and for the protection of all of us including you (the reader), it is important for the reader to understand the following legal notice before working on anything based on this information:
LEGAL DISCLAIMER:
The poster of this note is not a professional mechanic. As such, you understand that this information is not necessarily accurate and thus you use it at your own risk and agree that the author(s) herein are not liable for anythin you do, or any consequences or damages that may arise now or in the future.
THERE IS NO WARRANTY FOR THE INFORMATION, WHATSOEVER. THE INFORMATION IS PROVIDED "AS IS" WITHOUT WARRANTY OF ANY KIND, EITHER EXPRESSED OR IMPLIED, INCLUDING, BUT NOT LIMITED TO, THE IMPLIED WARRANTIES OF MERCHANTABILITY AND FITNESS FOR A PARTICULAR PURPOSE. THE ENTIRE RISK AS TO THE USE, QUALITY AND PERFORMANCE OF THE INFORMATION IS WITH YOU. SHOULD THE INFORMATION PROVE DEFECTIVE, OR INCORRECT IN ANY WAY, YOU ASSUME THE COST OF ALL NECESSARY SERVICING, REPAIR, CORRECTION AND ANY FUTURE LIABILITIES THAT MAY ARISE FROM THE USE OF THE INFORMATION.
IN NO EVENT UNLESS REQUIRED BY APPLICABLE LAW OR AGREED TO IN WRITING WILL THE POSTER OF THIS NOTE, OR ANY OTHER PARTY WHO MAY MODIFY AND/OR REDISTRIBUTE THE NOTE, BE LIABLE TO YOU FOR DAMAGES, INCLUDING ANY GENERAL, SPECIAL, INCIDENTAL OR CONSEQUENTIAL DAMAGES ARISING OUT OF THE USE OR INABILITY TO USE THE INFORMATION CONTAINED HEREIN (INCLUDING BUT NOT LIMITED TO LOSS OF LIFE OR LIMB) OR LOSSES SUSTAINED BY YOU OR THIRD PARTIES OR A FAILURE OF THE INFORMATION TO OPERATE WITH ANY OTHER INFORMATION), EVEN IF SUCH HOLDER OR OTHER PARTY HAS BEEN ADVISED OF THE POSSIBILITY OF SUCH DAMAGES.
Seriously - be careful. Working on fuel systems is flirting with disaster. With the legal info above in mind, what follows documents a set of steps used to change the fuel pump in a 1999 Saab 9-3 SE ARC 2.0 Turbo:
0) Step zero is a pre-requisite step - go read all that stuff above again. Beware of what you are taking on as a project. You are assuming all the risk associated with the project at hand. You are dealing with dangerous substances. Gasoline is flammable and explosive. Keep a fire extinguisher handy. Be safe and be careful.
1) Check the gas gauge and mark it's reading for future reference.
2) Disconnect the battery and lift the back seats.
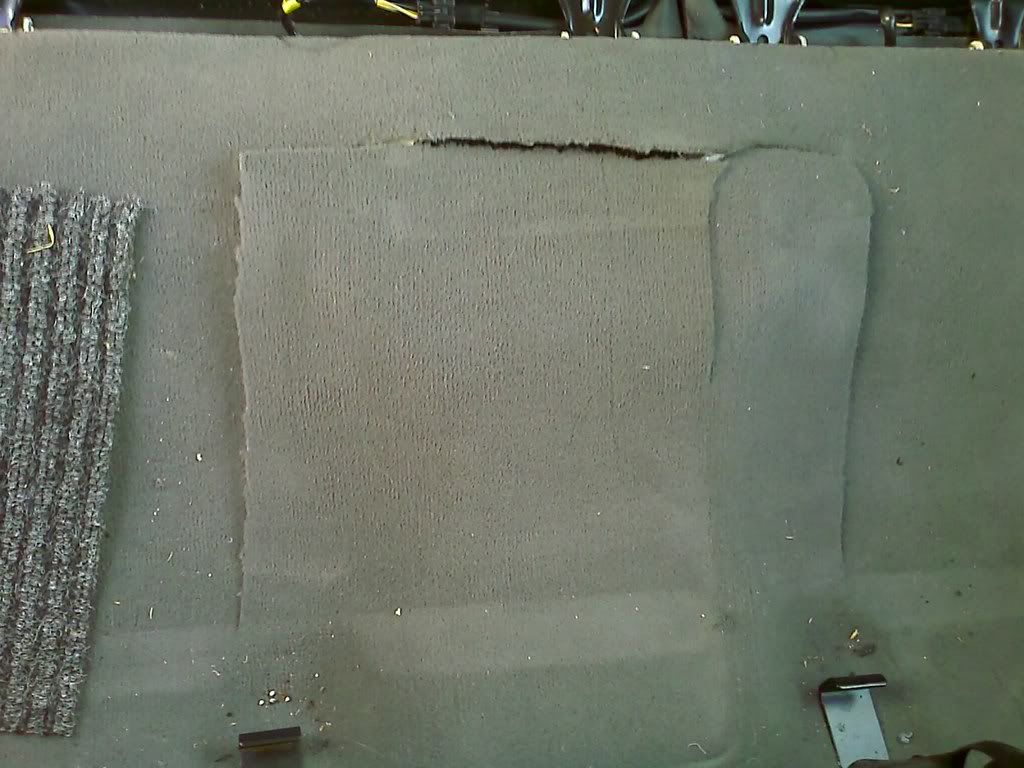
3) To gain access to the fuel pump without dropping the gas tank, you may cut the carpet and the access hole with a good pair of scissors and tin snips. Here's a shot of what I started with:
![Image]()
![Image]()
4) Remove the plastic cover that protects the fuel pump wiring block and check valves from dust and water. Just pry it up with the widest flat blade screwdriver you have. The cover is rather wimpy but it'll pry up ok.
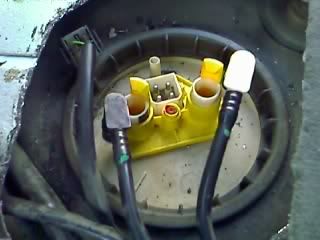
5) Disconnect the pump wire harness. Using a small flat screw driver, insert the screw driver flat between the harness connector and the yellow tabs beneath the 'clip' part of the tap. Gently rotate the screw driver so as to pry the yellow tab holders away from the block connector. Do this on both sides while pulling the connector up enough to keep the tab you are prying from dropping back into place. Then take out the block connector once both tabs are 'free' from slipping back into place. Be gentle with the tabs because breaking them, while not the end of the world, isn't a great thing. Just rotate the screw driver enough to make room for the connector to move up.
6) With the harness block connector out of the way, spray some WD-40 (or other reasonable lubricant) down into the plastic 'nests' in which the plastic check valves are (likely tightly) placed. Each check valve has two o-rings:
![Image]()
The o-rings have probably grown tight due to drying and sticking to the walls of their housings. Let the WD-40 sit a while (5 minutes or so) to work it's way in a bit. You should end up with someting like this:
![Image]()
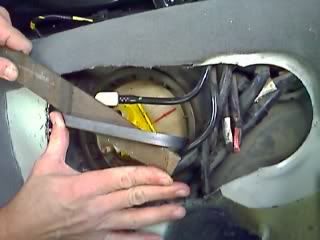
7) Working *only* with the top of the check valve, directly above the round valve housing, and *never* using any area or applying any pressure on the fuel line and/or the 'barbed' area to which the fuel line is connected, gently wiggle the check valves back-n-forth, using very small rotations. You will feel them loosening up as the WD-40 works its way in further. DO NOT RUSH! The check valves are delicate little toys (arguably poorly designed) and will break if you 'work them' too hard. The image here shows using pliers directly on the plastic, but to be even safer you should seriously consider 'buffering' the pliers by placing some rubber, folded paper towel, or some such thing between the pliers and the plastic:
![Image]()
8) *Gently* use your thumb to pry back the retaining tab holding the valve in place. Don't pry too far or the clip-tab may. If you do break one (or even both) - there are solutions (__link__), but if you are reasonably careful, they won't break. While keepint it pryed back, continue rotating the valve back-n-forth while pulling upward. Don't use a lot of pulling force, just enough to slowly lift the valved out. They will out quite well, but do yourself a favor and absolutely refise to rush at this effort.
At this point, you whould be seeing something like this:
![Image]()
9) Mark the placement of the fuel pump assembly with a Sharpie or similar marker. The image below (which is actually an image from when I removed the cap) shows the marker in red, of which there are two that should line up before you remove the cap: one on the the top of the fuel pump assembly, and a matching one on the car itself.
![Image]()
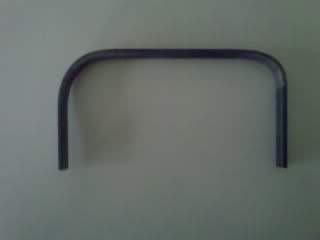
10) Make a cap ring removal tool. Saab has a special tool for this, but it's easy to fashion an inexpensive solution. Go get some 1/8" by 1/2" steel bar stock. Ace Hardware has it for $2 or so per three foot length. One of those is fine just cut what you need. Bend it into the shape as shown in the image below. The dimensions are 5 and 1/2" across and about 3" high. It's not critical that you get the dimensions exact since with 1/8" bar stock you can bend it a bit to fit when you use it.
![Image]()
11) Put the tool in the cap ring as shown in the image below. Make sure the 'legs' of the cap ring tool are near the ring inside edge and thus have plenty of material on the ring tabs to push against, Using a relatively long tool that you put between the 'legs' of the bent steel (a file works great since it gives good leverage and grips well) rotate the tool while pushing it down to turn the cap ring. Move the tool as necessary and keep turning 'til you can turn the cap ring the rest of the way off.
![Image]()
12) With the cap ring removed, take out the pump. This is a frustrating experience 'til you get the hang of it, but it's doable. Pull the pump module up about an inch or so and then rotate it clock-wise, say, 1/4 turn (don't force things here because you could bend the float arm or damage the float itself). At that point, the float arm is pointing roughly to the back of the car so you can start to get the pump up and finally tilt it out. You may have to use a couple fingers in the tank to grab the lower, canister part of the assembly tank and help position it to pull it up. Be carful, the spring steel bands holding the top to the canister part of the assembly are sharp. Also, keep looking down 'in there' to be sure none of the pump assembly's fuel lines are not blocking your progress in pulling the assembly up and out. Sooner or later you'll get it out far enough to tilt it sufficiently to get the float arm out. Don't force this - just work with it. It *will* come out.
13) With the pump assembly removed, start to disassemble it. There are four clips that hold the bottom canister of the assembly in place. Press them in and life out the pump cartridge and strainer filter from the enclosing canister. After this, you can either remove the strainer either before or after removing the wiring and tubing. The steps here remove the strainer after getting the pump/strainer out of the assembly.
14) Disconnect the wiring terminals from the pump cartridge. Note that the terminals are sized so assuming the new pump cartridge has correctly sized terminals, you can't mistake which wire goes where. If you are concerned, mark the new pump cartridge at this point so it is clear which wire goes where when it is installed. You can use needle nose pliers to remove the wire terminals, but be gentle or at the very least, buffer them with some rubber or other reasonable material so you don't crack the terminal housings.
-- continued in next post (reply) , there were too many images for one post --
I started an earlier thread here: http://www.saabcentral.com/forums/showthread.php?t=116993 because I'd not yet changed a fuel pump on a Saab and needed help. To the credit of this board, such help was supplied aplenty and with unmatched courtesy. With that said, and for the protection of all of us including you (the reader), it is important for the reader to understand the following legal notice before working on anything based on this information:
LEGAL DISCLAIMER:
The poster of this note is not a professional mechanic. As such, you understand that this information is not necessarily accurate and thus you use it at your own risk and agree that the author(s) herein are not liable for anythin you do, or any consequences or damages that may arise now or in the future.
THERE IS NO WARRANTY FOR THE INFORMATION, WHATSOEVER. THE INFORMATION IS PROVIDED "AS IS" WITHOUT WARRANTY OF ANY KIND, EITHER EXPRESSED OR IMPLIED, INCLUDING, BUT NOT LIMITED TO, THE IMPLIED WARRANTIES OF MERCHANTABILITY AND FITNESS FOR A PARTICULAR PURPOSE. THE ENTIRE RISK AS TO THE USE, QUALITY AND PERFORMANCE OF THE INFORMATION IS WITH YOU. SHOULD THE INFORMATION PROVE DEFECTIVE, OR INCORRECT IN ANY WAY, YOU ASSUME THE COST OF ALL NECESSARY SERVICING, REPAIR, CORRECTION AND ANY FUTURE LIABILITIES THAT MAY ARISE FROM THE USE OF THE INFORMATION.
IN NO EVENT UNLESS REQUIRED BY APPLICABLE LAW OR AGREED TO IN WRITING WILL THE POSTER OF THIS NOTE, OR ANY OTHER PARTY WHO MAY MODIFY AND/OR REDISTRIBUTE THE NOTE, BE LIABLE TO YOU FOR DAMAGES, INCLUDING ANY GENERAL, SPECIAL, INCIDENTAL OR CONSEQUENTIAL DAMAGES ARISING OUT OF THE USE OR INABILITY TO USE THE INFORMATION CONTAINED HEREIN (INCLUDING BUT NOT LIMITED TO LOSS OF LIFE OR LIMB) OR LOSSES SUSTAINED BY YOU OR THIRD PARTIES OR A FAILURE OF THE INFORMATION TO OPERATE WITH ANY OTHER INFORMATION), EVEN IF SUCH HOLDER OR OTHER PARTY HAS BEEN ADVISED OF THE POSSIBILITY OF SUCH DAMAGES.
Seriously - be careful. Working on fuel systems is flirting with disaster. With the legal info above in mind, what follows documents a set of steps used to change the fuel pump in a 1999 Saab 9-3 SE ARC 2.0 Turbo:
0) Step zero is a pre-requisite step - go read all that stuff above again. Beware of what you are taking on as a project. You are assuming all the risk associated with the project at hand. You are dealing with dangerous substances. Gasoline is flammable and explosive. Keep a fire extinguisher handy. Be safe and be careful.
1) Check the gas gauge and mark it's reading for future reference.
2) Disconnect the battery and lift the back seats.
3) To gain access to the fuel pump without dropping the gas tank, you may cut the carpet and the access hole with a good pair of scissors and tin snips. Here's a shot of what I started with:

4) Remove the plastic cover that protects the fuel pump wiring block and check valves from dust and water. Just pry it up with the widest flat blade screwdriver you have. The cover is rather wimpy but it'll pry up ok.
5) Disconnect the pump wire harness. Using a small flat screw driver, insert the screw driver flat between the harness connector and the yellow tabs beneath the 'clip' part of the tap. Gently rotate the screw driver so as to pry the yellow tab holders away from the block connector. Do this on both sides while pulling the connector up enough to keep the tab you are prying from dropping back into place. Then take out the block connector once both tabs are 'free' from slipping back into place. Be gentle with the tabs because breaking them, while not the end of the world, isn't a great thing. Just rotate the screw driver enough to make room for the connector to move up.
6) With the harness block connector out of the way, spray some WD-40 (or other reasonable lubricant) down into the plastic 'nests' in which the plastic check valves are (likely tightly) placed. Each check valve has two o-rings:

The o-rings have probably grown tight due to drying and sticking to the walls of their housings. Let the WD-40 sit a while (5 minutes or so) to work it's way in a bit. You should end up with someting like this:
which shows the valves already out so you can see its containing 'nest' into which you'll be spraying the lubricant.
7) Working *only* with the top of the check valve, directly above the round valve housing, and *never* using any area or applying any pressure on the fuel line and/or the 'barbed' area to which the fuel line is connected, gently wiggle the check valves back-n-forth, using very small rotations. You will feel them loosening up as the WD-40 works its way in further. DO NOT RUSH! The check valves are delicate little toys (arguably poorly designed) and will break if you 'work them' too hard. The image here shows using pliers directly on the plastic, but to be even safer you should seriously consider 'buffering' the pliers by placing some rubber, folded paper towel, or some such thing between the pliers and the plastic:

8) *Gently* use your thumb to pry back the retaining tab holding the valve in place. Don't pry too far or the clip-tab may. If you do break one (or even both) - there are solutions (__link__), but if you are reasonably careful, they won't break. While keepint it pryed back, continue rotating the valve back-n-forth while pulling upward. Don't use a lot of pulling force, just enough to slowly lift the valved out. They will out quite well, but do yourself a favor and absolutely refise to rush at this effort.
At this point, you whould be seeing something like this:

9) Mark the placement of the fuel pump assembly with a Sharpie or similar marker. The image below (which is actually an image from when I removed the cap) shows the marker in red, of which there are two that should line up before you remove the cap: one on the the top of the fuel pump assembly, and a matching one on the car itself.
10) Make a cap ring removal tool. Saab has a special tool for this, but it's easy to fashion an inexpensive solution. Go get some 1/8" by 1/2" steel bar stock. Ace Hardware has it for $2 or so per three foot length. One of those is fine just cut what you need. Bend it into the shape as shown in the image below. The dimensions are 5 and 1/2" across and about 3" high. It's not critical that you get the dimensions exact since with 1/8" bar stock you can bend it a bit to fit when you use it.
11) Put the tool in the cap ring as shown in the image below. Make sure the 'legs' of the cap ring tool are near the ring inside edge and thus have plenty of material on the ring tabs to push against, Using a relatively long tool that you put between the 'legs' of the bent steel (a file works great since it gives good leverage and grips well) rotate the tool while pushing it down to turn the cap ring. Move the tool as necessary and keep turning 'til you can turn the cap ring the rest of the way off.
12) With the cap ring removed, take out the pump. This is a frustrating experience 'til you get the hang of it, but it's doable. Pull the pump module up about an inch or so and then rotate it clock-wise, say, 1/4 turn (don't force things here because you could bend the float arm or damage the float itself). At that point, the float arm is pointing roughly to the back of the car so you can start to get the pump up and finally tilt it out. You may have to use a couple fingers in the tank to grab the lower, canister part of the assembly tank and help position it to pull it up. Be carful, the spring steel bands holding the top to the canister part of the assembly are sharp. Also, keep looking down 'in there' to be sure none of the pump assembly's fuel lines are not blocking your progress in pulling the assembly up and out. Sooner or later you'll get it out far enough to tilt it sufficiently to get the float arm out. Don't force this - just work with it. It *will* come out.
13) With the pump assembly removed, start to disassemble it. There are four clips that hold the bottom canister of the assembly in place. Press them in and life out the pump cartridge and strainer filter from the enclosing canister. After this, you can either remove the strainer either before or after removing the wiring and tubing. The steps here remove the strainer after getting the pump/strainer out of the assembly.
14) Disconnect the wiring terminals from the pump cartridge. Note that the terminals are sized so assuming the new pump cartridge has correctly sized terminals, you can't mistake which wire goes where. If you are concerned, mark the new pump cartridge at this point so it is clear which wire goes where when it is installed. You can use needle nose pliers to remove the wire terminals, but be gentle or at the very least, buffer them with some rubber or other reasonable material so you don't crack the terminal housings.
-- continued in next post (reply) , there were too many images for one post --
 .
.


