SaabCentral Forums banner

How To: Oil Pressure Sensor replacement

49K views 27 replies 19 participants last post by  dzlsabe  
#1 ·
Hi everyone,

Since there wasn't much information about that kind of job and it seemed to me to be a real PITA, I just thought that creating my first How To thread would be a great idea.
Advise: English is not my primary language, I'm sorry for any inconvenience.

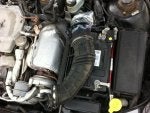
First things first, when you pop the hood, you should see something like this with more or less dirt. If not, this is not for you.


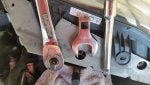
1. You will need a couple of Torx bits, a ratchet set, Jack and stand, the new sensor and a strange 27mm offset key (I used a table saw key that I bent).

2. Remove the turbo inlet pipe that comes from the air filter across the engine to the turbo. You will have to unscrew 2 tors bolts, the collars and unplug some hoses and connectors. You will have to separate the 2 hoses since it's easier to remove this way. The one that connects to the turbo I've just set aside, there was a hose I couldn't disconnect and didn't want to brake anything.


3. Remove the hose that plugs into the throttle body. Again there is some stuff to disconnect.


4. Unscrew the 2 torx bolts that hold the pipe in front of the engine. It actually hides the sensor's area. It was quite impossible to take a good picture of where the screws were. You will have to figure out on your own.;ol;

 
#2 ·
5. Jack the car and make sure to put a stand at a secure spot. Get underneath. You will have to unscrew the bottom collar of that same hose, unplug it, and gain access to the remaining bolt that holds this thing on the engine. Not easy!:confused:

6. Now your hose is free but you still can't remove it! Off course! You will have to unscrew the 2 arms where the radiator is sitted on. You can't remove them, but by loosening they will tilt down and give you a little bit of movement of the radiator, enough to get that hose out from the top.
Here are what the arms look like:


7. To remove the hose, you will have to turn it and pry on the radiator to remove it from the top. I don't like prying on stuff, but I've tried so different things, and it's the only way I've found to do it.

If you have any better idea, feel free to contribute!

8. Now, you should be able to see your sensor from the top. It is located on the front side of the engine (of course :roll:) near the AC compressor.


9. Disconnect the connector by raising the little plastic clip and pulling gently.
The bad news is, you can't fit a 27mm box in there, because the AC hoses are in the way. The best is an offset key.
I didn't have one, but I had an old neighbor, wich is better than tool.
He gave me a table saw key wich fits exactly on the sensor. I just had to bend it. You can apply some torque on the new sensor but be carefull, it doesn't hold your car together! :lol:


10. Now that the new sensor is in place, you can take a break and a cold beer.

11. Put everything where it belongs, replug every connector, and start the engine.
If there's something left, you can throw it in the garbage you won't need it anymore. :lol:

Hope this might help some people. I would have killed to have at least a little more info before getting angry 5 times :evil: because of that friggin hose I couldn't remove.

For now, my fingers are crossed, it seems to have solved my issue. We'll see in the long term.

If you have any questions, insults or complains, feel free to ask!

T3K
 
#7 · (Edited)
Thanks man! Now that is has gotten hot, at startup I get a "Low oil pressure - pull over and stop" message on the SID. Of course the oil level is fine, and it was changed about 2000 miles ago. The engine seems fine, certainly doesn't sound like it has an oil pressure problem, and I doubt it is a sludging issue as I have had the oil changed regularly, and what I can see through the oil fill cap looks very clean. Were you having similar issues? And if I may ask, how much was the sensor and where'd you get it?

EDIT: Never mind, I found your other thread, same issue I am having - still curious where you got the sensor and how much you paid. Thanks!
 
#8 ·
Yeah great, I think I've paid around 80$ for it at a local autoparts. I didn't call different places, and didn't even check on the internet because I wanted to do it right away. You may find someplace cheaper.

Until today, didn't get any other oĂŻl pressure alarm. So it seems like it was a bad sensor.
Good luck! If you need anything, feel free to ask!
 
#9 · (Edited)
This has got to be the WORST oil pressure switch EVER. Make or find the special tool similar to T3s wrench 27mm/1 1/16th. BTW, thanx for the picture. As you can see, if you can slip the "right" wrench/socket up there (that AC line in front of the switch is the HUGE headache)it can be done without removing the plumbing. We never did get the tube out of the way(got it loose lol) like T3 did which can easily turn this into a 2 hour GM swearapolooza.

BTW, the 27mm crowfoot WIS says to use 32025062.

Switch is VERY common GM V6...12621649, ACDelco D1800C
 
#10 ·
As you can see, if you can slip the "right" wrench/socket up there (that AC line in front of the switch is the HUGE headache)it can be done without removing the plumbing. We never did get the tube out of the way(got it loose lol) like T3 did which can easily turn this into a 2 hour GM swearapolooza.
Yeah, to be honest, I wanted to remove the switch with it in the way, it was driving me crazy. And it took me hours to finally find a way to remove it.
This is my worst PITA ever.

Even replacing a transmission on a volkswagen was easier than this!! :eek:
 
#11 ·
Great Help

T3K's photos and walk thru was a great help as I just replaced my oil pressure sensor.

I have a few extra tips that might help if you decide to tackle this PIA job.

When removing the tapered torx bolts from the tubing, note they are literally upside down. If you take a cheap aluminum tork wrench and bend it 45 degrees you can loosen the two screws on either side of the tube brackets. If you also loosen the bolt that holds your dip stick bracket, you have enough access to get to the oil pressure sensor. This will eliminate the need to disconnect the tubing from underneath as T3K has described.(it is a real head-ache to do so, which I did do).

The key to any job you tackle is always having the right tools. Since finding a saw wrench like T3K's neighbor had laying around is next to impossible, purchasea serpentine belt tensior replacement tool ($25.00 for two of them-one short, one long with 5/8 and 1/2 drives).

The second, and most important tool to have next is: Someone with a long skinny arm with long fingers. ( I enlisted my daughter).

After you push the tubing and dip stick to the right, have the long skinny arm reach down and disconnect the plug from the oil pressure switch.

Now, since there is not enough room for a 27mm socket, take a long screwdriver and bust the female connection of the old switch that is still in place.

I had my daughter then place the 27mm short socket over the switch.
Take the longer of the two serpentine belt tensioner tools and slid down behind the socket. You can pop it on the back of the socket easily.

A little lefty lossey and it is freed. Take the belt tool and sock off and I had my daughter unscrew it easily and hand to me. Had her take the new oil pressure switch and thread it in .

I did make a short handle out of my 27mm wrench so she could snug up the switch.(she could not get enough torque with the short hand to loosen the switch, but it works fine to snug up when the new one is put in.)

She then made the connection and I put everything back together.(one tip: the bracket on the tube housing is three sided and you can hardly see what you are doing when removing the bracket screw as explained above. I trimmed these back so when I went to put the torx screws back in the bracket, I could see them clearly and could actually then put a small socket and wrench around them and work the wrench).

One of the biggest pains is to remove the tube housing and get it past the radiator as T3K described. If you have some help with skinny arms, you really don't need to remove the housing and pull it out completely. It is a royal pain to put back in as well...twisting turning, loosening the radiator supports, disconnecting the clamps if they are not facing you, etc.

This did fix my issue with the SID coming on all the time with the Low Oil Pressure/Stop /Shut off Engine. Probably one of the most exasperating repairs I have ever done, but thought I would share some easy short cuts that would minimize this job.

I want to thank T3K for a great tuitorial with pics and step by step walk thru. It was a tremendous help and it right on the money if you have never done this repair before.

Wolf
 
#14 ·
If it is a 2 pin connector, I would say its a switch since it would be on or off, compared to a 3 pin wich can send a variation of voltage on the third wire, in this case would be a sensor.
It's been a long time, i dont remember. ;oops:


Glad I could help a little with some directions. And yes there is more than one way to do it. I've found that even the WIS might make you remove more parts than needed in some procedures.
What I did too on another repair is to cut one of the plastic bracket on the up/down pipe to make it easier to remove. Yes there is only 1 torx holding it now, but I thought that this was a good option for me considering I might have to remove it more than once in the years to come.
 
#19 ·
I just completed the job on my 2006 SportCombi Aero V6 and have a couple tips to add to this process.

Once the car was up on ramps:
1. Removed the upper core support/hood latch
2. Removed the air cleaner lid and attached hose.
3. Removed L & R upper radiator brackets
4. Removed lower cover and lower radiator brackets. Also removed the metal wire clip that holds the small coolant hose along the bottom of the subframe.
5. TIP: Instead of the turbo inlet tube removal, I removed radiator fans (It was tricky to extricate them but it gave me more room to see, get my hand in there and get the clawfoot tool on.)
6. Cleaned around sensor w/ contact cleaner and compressed air.
6. Unplugged wire and removed sensor w/ clawfoot tool Sunex 97734, $7 on Amazon), med length 1/2" drive extension and ratchet.
7. TIP: Since it was so hard to start threading the new one on by hand, I used a piece of old motorcycle radiator tubing (~1 1/4" OD) to give me something to hold and turn it.
8. Then tightened up w/ clawfoot & ratchet again.
9. Reinstalled everything else in reverse order. It took a few tries and a lot of positioning/repositioning the fans to get them back in as it's a tight fit. Going in at an angle and pulling the radiator out of the way worked.

Ironically, I had the entire front end off this car not 2 months ago to do the radiator and in hindsight, I would suggest replacing that sensor at the same time as a radiator replacement. It would literally only add 10 minutes to job.

Hope that helps!
 

Attachments

#24 ·
Just an update on this issue. I recently had the oil pressure switch go bad on my 2009 9-3 SportCombi Aero XWD. The "Low Oil Pressure" message appeared and I retrieved the P0522 ( Oil Pressure Censor Circuit, Low Voltage) DTC with my Tech 2. After reading several reports of the difficulty of this job because of the location of the switch, I called my Saab service center (Fox Saab, Grand Rapids, Michigan) and they will do it for $208.00, parts and labor. Money well spent from reading about others' experiences!
 
#21 ·
my experience

Long time lurker, first time poster.

I replaced my oil pressure sensor this week without removing as much as some people have described.

I did the first 5 steps like T3K described but did not remove that last tube he talks about in steps 6 & 7. I just pushed it to the side so I could see the oil pressure sensor. It certainly was tight but decided to give it a go and see if I could access it before removing more.

I spent about an hour figuring out the process of getting the crows foot with the ratchet extension down there and on the sensor and then attaching the ratchet. Attaching the ratchet should be easy except that you gotta do it one handed in a tight spot. I'd say the hardest part was figuring out the combo of little extensions that worked best around all the stuff in the engine bay.

From start to finish it took a little over 2 hours. An hour of which was spent messing with the crows foot and extension combo. The only way to prevent that hassle seems to be removing the radiator fan like Julio describes but it seemed like a lot of work so which led me to try it without removing all the other stuff.

On another note, how in the world are you supposed to get that screw back on the bottom of the pipe that goes down?? (dont really know how to describe it, it the one that T3K has the arrow pointing to in the pic under step 4). I tried for 10 minutes without getting even close and finally said 'f*** this' and grabbed a zip tie.

Hope this helps!
 
#23 ·
Long time lurker, first time poster.

I replaced my oil pressure sensor this week without removing as much as some people have described.

I did the first 5 steps like T3K described but did not remove that last tube he talks about in steps 6 & 7. I just pushed it to the side so I could see the oil pressure sensor. It certainly was tight but decided to give it a go and see if I could access it before removing more.

I spent about an hour figuring out the process of getting the crows foot with the ratchet extension down there and on the sensor and then attaching the ratchet. Attaching the ratchet should be easy except that you gotta do it one handed in a tight spot. I'd say the hardest part was figuring out the combo of little extensions that worked best around all the stuff in the engine bay.

From start to finish it took a little over 2 hours. An hour of which was spent messing with the crows foot and extension combo. The only way to prevent that hassle seems to be removing the radiator fan like Julio describes but it seemed like a lot of work so which led me to try it without removing all the other stuff.

On another note, how in the world are you supposed to get that screw back on the bottom of the pipe that goes down?? (dont really know how to describe it, it the one that T3K has the arrow pointing to in the pic under step 4). I tried for 10 minutes without getting even close and finally said 'f*** this' and grabbed a zip tie.

Hope this helps!


****, thanks for the zip tie tip. I just let it dangle because just like you, I gave up. I'll put in a zip tie this weekend.
 
#22 ·
Thank you for the write up.

I just did it this past saturday.

What a pain in the *** this was (especially since I have decent sized hands)

Few things I did different.


I bought an Offset wrench from Amazon with 27mm and 24mm socket on the other end. I cut it so it fits (instead of using a crow foot) worked pretty good.

Second I unbolted the engine from the engine bushing (by the air box) which allowed me to use a strap and pull the engine towards the engine bay giving me more room to get the tube out.


Everything else was the same (didnt take the fan out) but holy **** was this a nightmare.
 
#25 ·
Going through this right now on my '08 Aero.... this thread was very helpful. I ended up removing the SAI pump, which isn't bad and allowed me to remove the intercooler pipe pretty easily from below. I had previously purchased a few 27mm deep sockets which I had planned to cut up for c900 crank bolts, but never ended up doing that, so I cut one down to 2.25" which allowed me to remove the sensor. I gotta put everything back together tomorrow, but this was my approach. :)
 
#26 ·
I just replaced the oil pressure sensor in my 2.8v6 Turbo SAAB. I have also replaced the starter motor. If any one else has done these two jobs I can commiserate with you. These two jobs are nearly as bad as working on my Ford falcon ( ignition pack of inlet manifold removal). I find working on my old XjS v12 jaguar and my v8 triumphs (TR8) so easy in comparison. It is clear the engine in the SAAB was never designed to go into that car. Luckily the SAAB is not a bad car to drive or I would have gone to the scrap heap 100 times.
 
#27 ·
I just completed the job!! Thanks for all the good information. I took note of all the warnings but was still surprised at how difficult it was.

I did not remove the delivery pipe but removed all three torx screws to allow movement. A regular 8mm socket work with those torx screws and was a life saver. The 8 mm socket was much smaller and easier to control in the tight space than the torx socket.
 
#28 ·
Doing more of these lately. The Lisle 13200 is the only socket I've found to be perfect for both the V6 and 2.0T OPS.
On the V6 have never tried it on the ground, only a lift. I would not attempt on the ground.
V6 requires just bending the AC tube a tiny bit to get the socket on, then an adjustable pliers or short 1 1/8" to turn the socket. Once loose, take the socket off. You can barely see anything, so just go by feel.
2.0T requires the 10mm nut on the harness guide removed to bend it slightly out of the way, then a 3/8 to 1/4 adapter and flex ratchet.