SaabCentral Forums banner

V6 Oil Cooler Replacement Guide

59K views 98 replies 28 participants last post by  andybisnut  
#1 ·
Hi,

As promised, I replaced the oil cooler on my V6 and have written a guide to assist others.

Before you start you will need the following:
A new oil cooler
Oil filter
Sump plug washer
Coolant
Oil
RTV Sealant
Loctite 243
A range of torx drivers
A range of star drivers
22mm socket
30mm socket
19mm flare nut (split ring) spanner
usual other sockets

You also need a moderate level of mechanical savvy, and an inane amount of patience. Best get small children well out of earshot...

1. Get car up on stands and remove the lower plastic cover using a small torx and an 8mm socket.
2. Drain oil and coolant.
3. Remove oil filter
4. Upto the top, remove the main plastic engine cover using torx driver
5. You are now presented with an engine and you will need to remove the inlet manifold which is in 3 parts, but before doing so you have a lot of disconnecting to do. Personally I wrap a strip of masking tape around every wire or pipe I disconnect and write on where it goes.
6.Before you effectively open the combustion chambers open to the elememts, I would strongly recommend cleaning and vacuuming out the area surrounding the inlet. There is likely to be a fair bit of crud around there and you dont want it falling into an open bore.
7.Once you are certain you have discinnected every thing to the cast ali inlet plenum you can undo the 7 studs holding it on - 13mm socket.
Image

8.Carefully lift off the plenum and put it somewhere safe from damaging the sealing face.
9.Plug the 6 holes with something ASAP, making sure what you stuff in the holes doesnt introduce anything into the bore.
10.Now remove the middle inlet with the fuel rail complete - 6 off star headed fasteners - you do not need to disconnect the injectors.
Image

11. Place the middle inlet assembly carefully on the rear bank, again protecting the sealing face and bores
12. You can now remove the lower inlet assembly which is a moulded polymer part, 12 off star headed fasteners - same applies with protecting seals etc..
Image

13. You can now see the oil cooler set in between the vee, but you will need to remove the coolant distribution manifold to the right of the cooler, 22mm socket on 2 bolts an pull it to one side. Dont loose the washers...
14. Now undo the oil feed pipes on top of the cooler, 22mm socket again.
15. This is where it gets trickey. The oil pipes are extremely rigid and in order to get the cooler out you need to move them. The right way to do it is to disconnect the pipes at the other end, which is on top of the oil filter housing.
16. This is a pig of a job. First you need to remove the pipe that goes into the front of the filter housing for access(turbo feed?), 13mm socket. It will be tight.
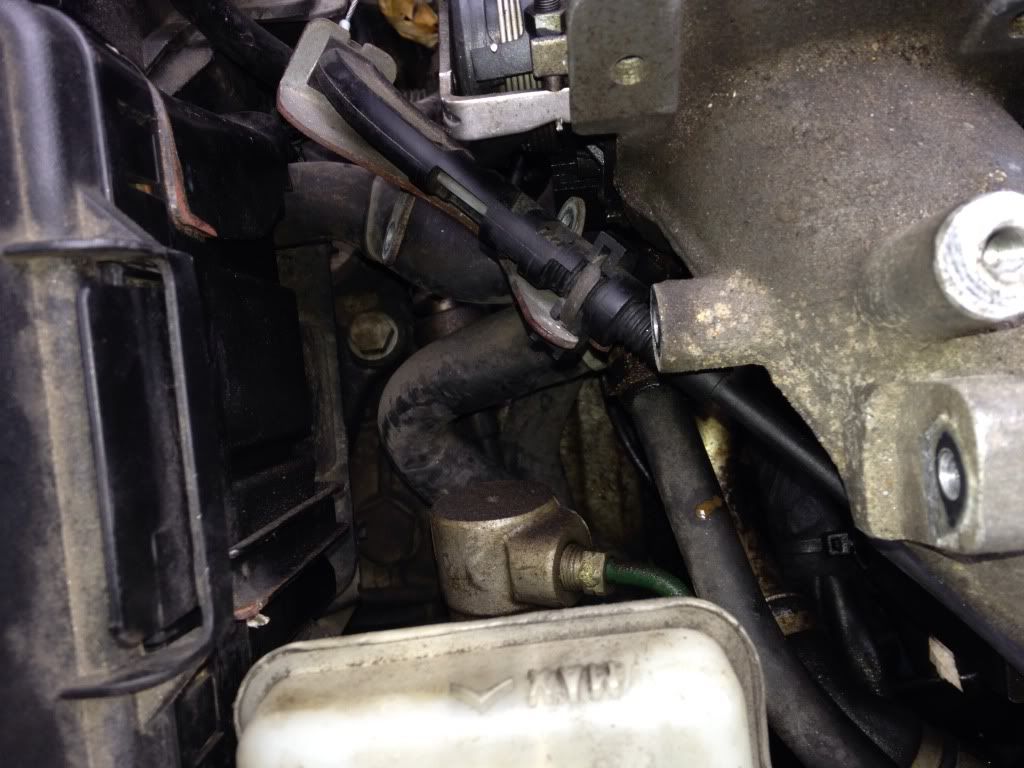
17. Then, with the 19mm split ring spanner you need to remove the 2 pipe nuts in the top of the housing, if it sounds easy it isnt. You are working at some quite unreasonable angles, the nuts are tight and you can only just get a sixth of a turn at a time. I reckon it took me 2 hours in total of mucking about and swearing.
Image

18. Once you have got these out, you should be able to move the pipes at the oil cooler end.
19. Remove the locknuts holding the cooler to the flange, 30mm socket.
20. Remove the 6 off star fasteners holding the flange on an hey presto - there is the cooler. Remove it and now clean out all the coolant and oil in there.
Image

21. Refiting is a reversal of above remembering to clean all mating surfaces and apply liberal amount of RTVsealant around the sealing faces of the oil cooler including the oil pipe connections.

Hope this helps..
Anthony.
 
#59 ·
Nathan 9⁵;2362630 said:
Just don't start the engine. That will add more oil to the mix.
Overheating is what caught my attention on Tuesday. Nothing flowing through the radiator. Tempted to drop the lower hose in a 5 gallon bucket with a garden hose refilling the bucket, and see if I can't clean any sludge out of the block using the heat from the engine and the water.
 
#60 · (Edited)
You're going to be defeating the purpose of flushing the oil out with the engine running. And of course you have to remove the lower hose to drain all the junk out of the radiator. You can't sufficiently do the job with just draining through the drain nipple.:nono;


I forgot how difficult it is to remove the lower hose and open the drain nipple on the 2002+. The 1999-2001 is much easier. Man, I feel your frustration right now. It might be easier just to remove the radiator to flush the hell out of it than having to fiddle around with all of the brackets and things in the way under the car.
 
#61 ·
Nathan 9⁵;2362636 said:
You're going to be defeating the purpose of flushing the oil out with the engine running. And of course you have to remove the lower hose to drain all the junk out of the radiator. You can't sufficiently do the job with just draining through the drain nipple.:nono;
I have a sludge/paste that is not free flowing. I have disconnected the upper and lower hoses and tried to run water through the radiator. No dice.

Assuming I have that same paste/sludge in the engine. Thinking that I want to heat the engine up and run water through it to remove the paste/sludge. I know I'll have to clean out the engine once the oil cooler is replaced, but right now I'm concerned that I have blocked passages. Just wanting to make sure I don't have a bigger issue before I buy the expensive parts.

Not even sure this will work because I don't know the state of the thermostat. Brain is running 90 mph with all the concerns I have at this point about this issue. The paste has me really concerned.
 
#62 ·
Nathan 9⁵;2362636 said:
I forgot how difficult it is to remove the lower hose and open the drain nipple on the 2002+. The 1999-2001 is much easier. Man, I feel your frustration right now. It might be easier just to remove the radiator to flush the hell out of it than having to fiddle around with all of the brackets and things in the way under the car.
You aint kidding. Getting to that lower hose is a *****! Required removal of the battery and tray and a very long air intake tube that had screw on hose clamps on the bottom that were virtually impossible to get to! And.....I can't even see where the lower hose connects to the block. Holy sh....!
 
#63 ·
The cooling system is really simple, I wouldn't worry about it being clogged permanently. It's just a matter of dedication you're going to have to devote to the car to get it flushed out completely. It is worth the effort. Trust me, this is the last unexpected failure you'll encounter. If it were my car, I'd remove the radiator completely and try my best to flush that out. Give me a few minutes and I'll post up a video of how to remove the radiator and good places to flush the engine, and an easier way to remove the lower hose and drain nipple.
 
#66 ·
Definitely the easiest and best decision is to replace the radiator. ;ol;

And just for those who might like to see, here's what the inside of the radiator end tank looks like on the transmission cooler and lower radiator hose end. This was after flushing the system several times with water and Cascade. Nearly clean but you can still see there's sludge stuck at the top of the tank. The core of the radiator was clean though. My rubber seal was mushy from the oil contamination and started to leak.


BTW DO NOT BUY A NISSENS BRAND RADIATOR, EVER. They're CRAP! The ATF cooler leaked twice on my previous Volvo 850 T5. And before it leaked, it never cooled the ATF as well as the Valeo original, so the transmission would shift harsh once it was warm. The same harsh shifting happened with my '01 Saab. I took it out and replaced it with a genuine Saab/Valeo radiator before it leaked and created another sludge milkshake mess. Neo Brother's Saab Parts in the UK have genuine Saab Valeo radiators for $220.25 shipped to TX.

And a few other pics of the radiator/Intercooler removed:


Inside the original Valeo ATF cooler:


Outside view of the Valeo ATF cooler:


Inside the POS Nissens ATF cooler that are notorious for ATF leaks:


Notice the pathways have fins inside, obstructing the flow of ATF through the cooler. I can't stress enough to everyone not to buy a Nissens radiator with an internal ATF cooler. Get a genuine Saab/Valeo made radiator. Of course unless you love having to remove and replace parts, or love paying labor fees for the job to be done, plus having to flush out the strawberry milkshake sludge in your cooling system and transmission, just to save maybe $50 max on an aftermarket part. But you're not really saving any money, you'll be wasting money, and time, like I did. More than once.
 
#67 ·
Here's a link to Neo Bros. Genuine Saab/Valeo radiator.

That's about $25 less than an aftermarket Nissens radiator sold by eEuroparts.


...and I don't want to come off sounding like I'm telling anyone how to spend their money. I just want to let people know from my experience with aftermarket parts. They're just not worth the "savings" They always fail sooner, they're cheaply made and they don't function as well as genuine parts. You get what you pay for, and you're paying for inferior quality parts. So in the end there's really no savings if you're having to replace them sooner, having to pay labor fees for this, and then there's the possibility of damage to other parts (transmission) due to failures that would not normally occur with a genuine part. The ONLY part I've had good luck with aftermarket is the heater bypass valve. Haven't had one fail yet.
 
#70 ·
Was the wrong radiator! Upper and lower reversed. How do you screw that up? He said he has the right one, just grabbed the wrong one. Anybody got a pic of a radiator for a 2002 V6? I know the upper is on the pass side, and the lower is on the driver. Anything else I need to be looking for (other than the trans cooler line attachments?
 
#73 · (Edited)
Just got all my parts from Rockauto. Had to buy the t-stat and the housing separately. The housing has the thicker bolt holes and the stubs for securing the t-stat flanges. The t-stat I received does not have the flanges. It looks like any other t-stat I've seen. Can I use it with the new housing I have?

Is there a disadvantage to using this one versus the one with the mounting flanges?


EDIT 4/30 @ 3:45pm: Local NAPA has the flanged t-stat for $11. Headed there. Problem solved.
 
#76 ·
Alright I'm doing the job tomorrow but I had a questing about the oil feed pipes(?). I read that some people just bend them out of the way instead of going through all the work to remove them completely. Is this possible at all, and if so a good idea? It seems like it would save a big portion of time.

Also where do i use the RTV and the Loctite?.... I understand their use but I want to nitpick and make sure I dont miss something hah
 
#79 ·
Agreed with radview above. It's not necessary or easy to remove the two oil feed pipes. I just bent them (the shorter one is very stubborn - use a rope and take your time). I talked to a reputable indy about this afterwards and he said he never removed oil feed pipes from below for this job as well.

Make sure you use new banjo bolts and seal rings --the old ones may be slightly bent and took aluminum threads off the oil cooler under high temperature and torque.
 
#78 ·
The oil cooler cover needs sealed with RTV. I used Loctite Red 518 anaerobic gasket maker to seal the oil cooler in my 2001 9-5 SE. I've seen other RTV sealant recommended, but I went with the Loctite anaerobic because it becomes liquid if it were go into the coolant.

As you will see when you take everything apart, the oil cooler sits in a compartment that allows the oil cooler to be immersed in coolant. The oil cooler cover sits on top of the oil cooler and seals that compartment. If the oil cooler cover seal fails, you will have a coolant leak. A slow coolant leak is why I resealed the oil cooler cover.

On the question of whether to remove the oil lines or bend them out of the way, I tried removing the oil lines from bottom of the engine, but the space was too tight to get the necessary leverage. I ended up carefully flexing the oil lines out of the way to remove the oil cooler cover and oil cooler. I think "bending" the oil lines is too strong of a term.

The DIY of replacing the oil cooler was fairly reasonable for me once I decided not to remove the oil lines. Where I got into trouble was when I did preventive maintenance by also replacing the thermostat. That job was a huge pain.

Good Luck.
 
#80 ·
Amazon.com: ACDelco 93176626 Engine Oil Cooler: Automotive

I ordered this but it doesnt look like it came with replacement bolts; just the washers and o-rings. What bolts would I look for to replace? Are these something that I could find at a local hardware store or would i need to order something from the manufacturer


-- one of the comments mentioned that I may need to purchase the seal kit aswell. Can anyone confirm to me what that's referring to?
 
#81 ·
http://www.saabusaparts.com/V6-Oil-Cooler-Seal-Kit-99-03-9-5-V6-p/pkoilcoolerk.htm . This is the seal kit. If you use your own sealant, then you can get respective parts separately via eeuro. You kinda have to replace these rubber seals -- a lot of mine were cracked due to age and heat.


Amazon.com: ACDelco 93176626 Engine Oil Cooler: Automotive

I ordered this but it doesnt look like it came with replacement bolts; just the washers and o-rings. What bolts would I look for to replace? Are these something that I could find at a local hardware store or would i need to order something from the manufacturer


-- one of the comments mentioned that I may need to purchase the seal kit aswell. Can anyone confirm to me what that's referring to?
 
#82 ·
I'm a little lost on how to remove the plenum. It's still attached to the throttle body, how to I disconnect this part. Everything else is nice and simple.

When looking under the throttle body trying to figure out how to remove this I noticed a hose that has burst. Can anyone identify this?

This is the break right under my throttle body leading to the engine.
Image


Dead in the middle with the 90 degree bend is the hose im referring to. Off to the right of the frame is where it ruptured.

Image
 
#85 ·
im still lost. How many are there in total? I removed two from the throttle body side and three from the manifold side. I removed the throttle body bracket thing actually holding the throttle wire, one from another bracket a little away from the throttle body just holding the manifold, all of them from the manifold itself, and all the wires. I still cannot for the life of me remove it from the manifold. Everything else is free moving. I'm starting to eye a hammer and chisel