SaabCentral Forums banner

Timing Chain Help

1 reading
10K views 36 replies 10 participants last post by  reece1977  
#1 ·
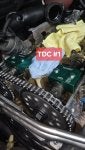
My friend and I are replacing the timing chain and guides on a B207R engine and I have run into a problem. While following this video I tried to line up the timing mark on the harmonic balancer with the mark on the timing cover as shown in the video here, but it was never able to align so I decided to continue with the job anyway in hopes it could be fixed later. Further into the job I had removed the chain guides and tensioners and further rotated the crankshaft about 5 times which caused a few of the chain links to skip. It was at this point I asked for help and realized that we needed to line up the marks on the camshaft sprockets as shown in this video. The problem is that my sprockets do not have marks on them. We googled the number printed on the sprockets and found it on amazon and you can see in the picture there are no marks, which leads me to question how they lined up the marked links on the timing chain in the first place. One of the holes in the sprocket is a bit larger than the others, which we thought might be the "mark", but the sprockets in the other videos also have larger holes which are not related.

At this part in the video they show how the sprocket marks should be at 6 and 12 o'clock, but mine never seem to line up that way.

So my concern is that the engine might now be out of time because I slipped a few links in the chain while rotating the engine without the guides and tensioner, but also I have no way to know how to line it up to "good enough" to be able to rotate one of the camshafts independently a small amount to correct this and then use the camshaft alignment tools. Assuming I can get that part complete and remove the old timing chain, how would I line up the links on the new chain?

For now we put the guides and tensioners back on (hand tight) and reactivated both tensioners. We rotated the engine a bunch of times using the harmonic balancer after that but decided we should post on the forums and get help before proceeding further and potentially damaging the valves by ruining the timing even more.

Other info:
  • One of the guides was broken and making a ticking noise which is why we are doing this in the first place
  • When I rotate the engine I hear a suctioning sound sometimes, I figured that is normal but worth mentioning

Image
Image
Image
Image
Image
 
#4 ·
However the WIS says to do it. Forum questions & youtube how to's are great for many things but for engine work its best to go with the procedure exactly as written.

You obviously need to start with finding TDC & timing each cam from step 1 (as if you were assembling the engine after a rebuild)....and be careful rotating the engine cause even by hand you can cause valve damage if you apply enough torque.
 
#6 · (Edited)
Where can I find the procedure for finding TDC and timing each cam from step 1? Which procedure on WIS should I follow? I started out using WIS for this but the instructions were not complete. This step:

"Lower the car and zero the engine by turning the crankshaft in the direction of rotation of the engine until the marking on the crankshaft pulley is aligned with the marking on the timing cover. The cam lobes on cylinder 1 intake and exhaust camshafts should be pointing up/in. (A)"

was impossible from the start because timing must have already been off due to my broken balancer chain tensioner guide.

I found on WIS how to replace the camshafts, but it does not mention how to set up timing. Also I am unclear on the instructions, it sounds like if I take out the camshafts I need new camshafts and rocker arms? Or is it just if I actually put different (new) camshafts back in the engine that I need new rocker arms, and if I am putting back my old camshafts I can reuse my old rocker arms? Is it even required to remove the camshafts to set the timing?

I also found the instructions to check the camshaft setting which looks like it could be what I need but it mentions on step 16 "If the adjustment tool does not fit onto the cams, loosen some of the camshaft pulley bolts, grip the camshaft flats with a wrench." but as far as I know there is nothing called "camshaft pulley" or "camshaft pulley bolt", do they mean the camshaft sprockets? From my research the sprockets are held on by the torque pressure of the bolt, unlike other versions of the ecotec which use a key index feature, so that would make sense, or is there actually something called camshaft pulley? I couldn't find anything like that on any parts website so I think it is a typo.
 
#7 ·
Wow. So many questions. This is a bit like doing brain surgery at home. Firstly, I assume from your comments that you are using the Saab Timing Sprockets/Gears/Pulleys without keys or timing marks. Remember that Saab is/was in Sweden and everything you read in WIS has been translated from Swedish. So in WIS "pulley" is the same as sprocket mistranslated. Some of the other English is equally unintelligible. It is common for mechanics to refer to these as gears because they have teeth. No. A chain uses sprockets. Same for toothed belts. Gears have an involute profile and engage with another gear to provide constant speed motion. As I have done TC jobs on these (L61 and B207) engines 3 times now I think I can give some advice. Regarding your TDC problem there are a couple of hints. The crank pulley has a notch on the rim that should align with the mark on the timing cover. But assuming you already removed it then that isn't possible. So there should be another mark on the block above the crank sprocket. You can insert a probe through the spark plug hole on the #1 or #4 cylinder and find the high point. You can get very close that way. As you already have the sprockets off then make sure all the valves are open when you rotate the crank. Don't worry about going forwards or backwards with the engine in this state. The keyway on the crankshaft is also aligned with the timing marks on the sprocket and crank pullley. They should all point straight up. Next, there are some reference marks on the camshaft. Review my post on using the Cloyes L61 timing chain set install with keyed sprockets.
You should be able to get very close aligning those marks with the corner of the cam bearing cap. If you have the alignment blocks then great, put them on and button it up. If you choose to trash the unmarked sprockets and get keyed ones please carefully review the information regarding using #4 TDC and the skipped tooth. You should be OK given you have the gauge blocks. I am skeptical these could fit well enough to be as accurate as the keyed method. But I haven't used them (yet) so I can't say for sure. Note - one other poster on this forum has used the L61 Cloyes kit on the B207. That is where I got the skipped tooth info. The cast ridge observation is mine. You can post more questions or PM me.
 
#8 ·
First of all thank you, born again, for the very detailed reply. To clarify, I still have the sprockets on the camshafts and have not removed the chain yet. I have removed the timing cover but my idea was that after removing the chain and sprockets I would put it back on temporarily and then slide the crank pulley into the key on the crankshaft and rotate it by hand to line up with the mark on the cover, then carefully remove the crank pulley and cover again. As far as I understand it, there should be no harm in rotating the crankshaft if is not connected to the chain?

Can you explain a little more about the probe? I'm imagining an endoscope but is there a specific device that I would stick down into the spark plug hole to see something, and what exactly would I be looking/feeling for? I assume I would have to take out the spark plug and would see the top of a piston, or poke it with a long thin stick and just feel it out.

As for making sure the valves are open when rotating the crank, how would I do this? If I rotate the camshafts using the sprockets without the chain on such that they are aligned with the alignment tool, would that be sufficient to know the valves are open or is there another way to determine this?

In your post you mention that you hadn't replaced the balancer chain, but hoping you might have some insight or have done it on one of your other two jobs. The marks on my balancer sprockets which are supposed to point at 6 o'clock for the exhaust and 12 o'clock for the intake are both pointing at 6 o'clock. With the balancer chain off, would it be safe to rotate them to the correct positions when fitting a new chain? I assume so because this would be needed to line up the marks on the chain with the marks like in this picture, but I figured it is better to ask just in case.
 
#9 ·
Here is what the keyed sprockets look like.
Both sprockets are the same and have both intake and exhaust timing marks. They key is offset from the centre of the camshaft. For some reason, with the keys engaged these sprockets line up backwards if you use #1 TDC for the cam positions. So to make it all fit you need to use #4 TDC - the cam lobes pointing up and in.

If you are using the Saab sprockets and the alignment blocks then use #1 cylinder TDC position for the cams.
 
#35 ·
Now I see what you were mentioning about #4 TDC:

For some reason, with the keys engaged these sprockets line up backwards if you use #1 TDC for the cam positions. So to make it all fit you need to use #4 TDC - the cam lobes pointing up and in.

If you are using the Saab sprockets and the alignment blocks then use #1 cylinder TDC position for the cams.
I kind of glossed over that in my job since I have the Saab unmarked ones, but that seems worth considering.
 
#10 ·
So much to process... Yes, slide the harmonic balancer/Crank Pulley back on for the notch. Also, you can reinsert the bolt and tighten it a little bit to use a wrench to turn the crank. If the chain is still on then it is OK to go FORWARDS but not back. Once the cams are positioned and the chain is off then the crank can go either way. I have gone both ways with the chain on but the chatty class advises against this. Once the plugs are out the only risk is to jump the chain a tooth. If the guides and tensioner are OK and the chain isn't super elongated then this isn't likely. The probe can be a screwdriver, a 6" lg. x 1/4" square drive extension, dowel, etc. If you want to get fancy you can use a dial indicator. But you are just trying to get close. If you install the blocks before loosening the cam sprocket bolts the crankshaft must be in the proper location (unless a skip has happened).

With the cams on the #1 cylinder in the lobes in the proper up and in position for the blocks all the valves are closed and you can rotate the crank at will. But don't do that as you should have already set the crank before loosening the cam sprocket bolts. Then you would have to reset it using the balancer.

You seem to be very meticulous. That is a good thing. Remember that after you put the timing cover back on you are going to re-check the alignment using the balancer. You are right to research this before diving in. It is stressful.

Last thing, check the balancer for a groove where the front seal rubs it. Definitely install a new seal, but if there is a deep groove then get a Speedi-Sleeve to give an ungrooved surface.

Here is a video that may be helpful, but using the keyed sprockets-
 
#12 · (Edited)
With the cams on the #1 cylinder in the lobes in the proper up and in position for the blocks all the valves are closed and you can rotate the crank at will. But don't do that as you should have already set the crank before loosening the cam sprocket bolts. Then you would have to reset it using the balancer.
For this, I have tried to set the correct position (lining up the notch on the harmonic balancer/crank pulley) but with the chain on it is impossible to hold this position, it requires me to hold a lot of pressure on the balancer to do this. I believe it is because of a few skips that probably happened. Strange that I never got a check engine warning about it. So I think I will have to do the following:

1. Remove the guides, tensioners, sprockets and chains
2. Gently refit the timing cover
3. Refit the sprockets with enough pressure that I can rotate the camshafts by hand to the "up and in" positions
4. Use the alignment tools by pushing them down on the cams to ensure exact "up and in" positions
5. With the cams now properly aligned, as per your suggestion, it should be safe to now slide the harmonic balancer back in its key and rotate the crankshaft (without the chain on) so the notch on the balancer lines up with the mark on the timing cover
6. Remove the balancer and timing cover
7. Fit the chains, guides and tensioners (including manually adjusting the freely spinning balancer sprockets for the exhaust and intake such that they match the marks on the new balancer chain)
8. Activate the tensioners
9. Remove the cam alignment tools and refit the bearing caps
10. Use the old bolt in the crank with a wrench to turn the engine two full rotations
11. Remove the bearing caps and refit the alignment tools to ensure timing is still accurate
12. Refit the timing cover and torque the new TTY bolt in the harmonic balancer
13. Torque the new TTY bolts for the two timing chain sprockets


You seem to be very meticulous.
Thank you for the wonderful complement, and for all of your detailed advice :)
 
#14 ·
On my phone so bad typing. The chain should be tensioned for final alignment and before torqueing the cam sprocket bolts. See WIS for this. I am concerned about the resistance you have. I wonder if you may have a skipped chain. Try using an open end wrench (22mm?) on the camshaft to help positioning. If you can't get it to stay you could use the cardboard under the cam cap trick to clamp it. Clamping pliers may also be useful.
 
#15 ·
I think the camshaft will be easy to rotate with the open ended wrench once I remove the old chain. I am 100% certain I have skipped links on the chain, which is why I want to "start over" as Steve suggested, and completely remove the chain so I can adjust the camshafts and the crankshaft manually into the correct positions. I think the only way to get them in the correct positions now is without the chain linking their movements.
 
#16 ·
One more thing. If you use Vise-Grip pliers on the camshafts be sure to protect the surface so the teeth don't leave marks. Oh, and don't forget to place a rag below the crank sprockets to prevent small parts from dropping into the oil sump. It will ruin your day to have to remove the sump.
 
#17 ·
Unfortunately I am planning to remove the sump anyway because as I understand it, that is where the broken pieces of the balance shaft tensioner guide have likely ended up and they should be removed to prevent clogging of the oil system. What kinds of small parts will be dropping from the crank sprockets?
 
#18 ·
Wow! This did seem like brain surgery. Did you get it all buttoned up and running, @Snowden? I've done a timing belt on a non-interference engine before. Twice actually because I screwed up the first time which is why I'm pretty nervous about attempting anything timing related on the 9-3. Might have to anyway with the noises I'm hearing in the engine bay.
 
#19 ·
I notice there is an error in my post #7 above. The valves must be CLOSED, not OPEN when rotating the crankshaft or they will contact the pistons and bent valves will happen. With the chain off and the plugs out the crank should turn easily. If any resistance is encountered that means that valve to piston contact may have occurred.
 
#20 ·
Wow! This did seem like brain surgery. Did you get it all buttoned up and running, @Snowden? I've done a timing belt on a non-interference engine before. Twice actually because I screwed up the first time which is why I'm pretty nervous about attempting anything timing related on the 9-3. Might have to anyway with the noises I'm hearing in the engine bay.
Hi CarSnaab, I eventually did get this project completed and the car is now running, but not before I had to replace every valve in the cylinder head for fear I bent them when forcing the engine through rotation when it was out of time. In the end I learned a lot about the internals of the B207R and engines in general, so I'd say it was worth it.

I think the total cost was around $3500 including new radiator and intercooler because I dropped my car on the jack and crushed those two parts, and a new turbocharger center housing rotation assembly. If you're only doing the timing chain and don't make the same mistakes I did, I think the kit was only $200 and included a water pump. They sell cheaper ones without the water pump.

To avoid my mistakes, make sure you put the engine on time before you start undoing the chain guides. Use the timing tool (two aluminum blocks shaped to the correct cam positions) to achieve this. If your engine is not on time for whatever reason, don't rotate the engine.
 
#25 ·
Not to resurrect an old thread, but I wanted to say thanks to the people who contributed. It helped me out a ton while I spent the last couple days struggling with my own timing chain adventure. At 110k miles, it was due and every hole and cover on that side of the engine had evidence of slow oil leaks. What started out as a while you're at it turned into a harrowing moment when the first balance chain guide bolt snapped off in the block. Sorted that out and then ran into the backwards cam gears once I thought I was making headway. It was an incredible relief to see an explanation for that. The job was a heck of a learning experience, but I now have a happier engine that is running quieter than when I bought it a year ago. Just a few more things to go and my to-do list for 2025 will be completed. Thanks again.
 
#29 ·
All of the internal timing components looked fine, so the "repair" was more about preventative maintenance in that respect. I was getting some noise at startup on the timing chain side of the engine, but I think that was more the fault of the belt tensioner (also replaced). I set the original chain next to the replacement and it looked to have had been a couple millimeters of stretch added to the length, so I may have just been ahead of a problem beyond all of the covers leaking from near solid and cracked gaskets.
 
#31 ·
After reading your posts it appears that my timing issue is related to the non Saab Cam Sprockets that needs TDC#4 rather than TDC#1.

I want to preface this by saying I have ADHD i take my time and spent months planning this (started the timing kit replacement 5 days ago) and I can't say I found any mention of the Cam Sprocket issue. I am very meticulous to the point I lay out every part that needs to be installed, labelling socket and torque spec amd cleaning and returning every tool that won't be actively used in the next 3 minutes. I will lay down tools if I think something is wrong. Unfortunately I left that too late on this occasion.

So I followed WIS:


Spark plugs removed and timing marks on Crankshaft Pulley and Block are aligned. Cam locks installed on TDC#1.
Image

Everything aligns internally until I get to changing the Cam Sprockets. At TDC#1 the Cam keys face inwards which puts the INT indicator at the 9am position to the Exhaust Cam and the EXT indicator at the 3pm position on the Intake Cam. The dark grey links on the timing chain sit at 10am and 2pm on the Cam Sprockets.
Image


Image


To compare, I put on the Original Saab Cam Sprockets but there were no defineable marks or key. So I went back to installing the new Cam Sprockets

It wasn't until I put on Timing Cover, Crankshaft Pulley and removed the Cam Locks did I notice that there was a 1cm gap (maybe less) between the time on the Crankshaft Pulley and the Block.
Image

I foolishly rotated the Crankshaft Pulley two times with the same result (the Pulley moved just as freely when I originally set time) The #1 cylinder was sitting at TDC and the Cam Lock slipped directly on which I proceeded to torque down.

I knew.something was amiss, which has lead me to this thread.

I understand that I need to set #4 to TDC to use the new Sprockets. I just don't know how to get there from where I currently am.

What is confusing me, is, if timing of the Crankshaft Pulley with the block can only be achieved when TDC#1 because of the original Saab Non keyed Cam Sprokets, would those timing marks align to TDC#4? If not how do you go about setting time and changing the Cam Sprockets?

I would really appreciate your insight into my predicament
 

Attachments