SaabCentral Forums banner

Serpentine Belt How To

2 reading
94K views 78 replies 49 participants last post by  gregorym  
#1 · (Edited)
Serpentine Belt How To (DONE!)

Disclaimer - The following describes my experiences with my particular car, a 2004 9-3 linear. YMMV :D. I am not responsible if you damage your car or yourself by following my example.

Safety First - Never crawl under a car supported only by the jack. Safety glasses and mechanics gloves, and the presence of a responsible adult are always a wise idea.
:nono;

Replacement Interval According to the service booklet that came with my car, belt replacement is recommended every 60,000 miles. Since I have no evidence that the previous owner got the belt replaced, I decided to do it myself at 80K.

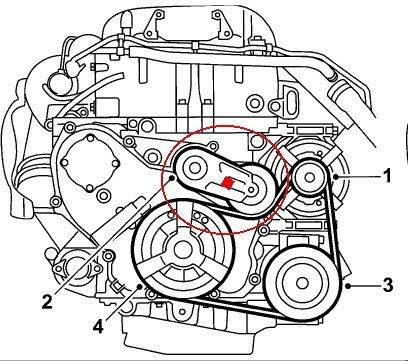
The picture below will get you oriented, I've circled the tensioner. It's spring loaded and helps to take up the slack in the belt. This makes belt changes much easier (in theory) than they were when alternators and the like had to be moved on their brackets to adjust the tension.

The tensioner can be moved by putting a tool with a 3/8" square drive into a hole (red square) in the tensioner and moving the tool up. Unfortunately, you'll need to learn to do this without being able to see the hole very well :roll:

Image


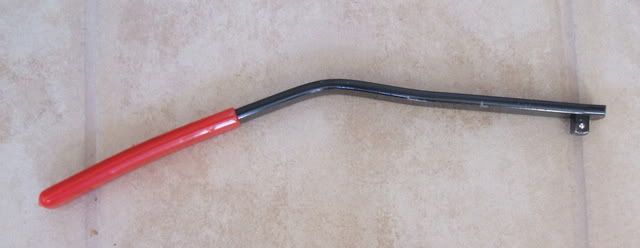
The first step is to buy the tool, it looks like this:

Image

Unfortunately, the tool I bought was too long fit, either from above or below. One problem is that the 3/8" square protrusion is fixed. It's the same size as the one on a ratchet, but unlike a ratchet it doesn't move, making it difficult to find a position under the hood (or below) that would tolerate such a long tool. A ratchet or breaker bar are too wide to fit between the tensioner and the fender :(

The solution:

Image


I mangled the bar - I cut off several inches and bent what was left - you'll see why eventually. There must be a better/different tool, but I was impatient.

I wound up doing the job twice because the new belt I had on hand was too small :evil: (see below). The first time I put the car safely on jack stands and removed the wheel. This lets you remove the two circled bolts.

Image


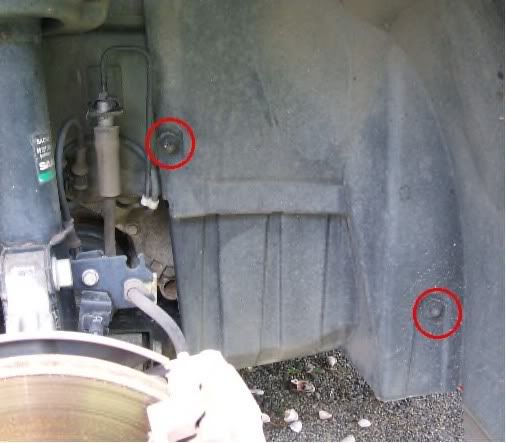
The fender liner is moved aside, permitting you to see the lower pulleys clearly. You might need to remove a couple more nuts, depending, but you don't need to remove the entire fender liner. It turns out that removing the wheel is NOT necessary, you have perfectly good access from below if you put the car safely on ramps, instead.

I used ramps and wheel chocks the second time, and it was much easier.
 
#2 · (Edited)
Once you've loosened the fender liner and you can see the lower pulleys, you need to insert the tool into the tensioner. I experimented with many positions from above and below. The best is above, with the arm of the tool forward, thus:

Image


You can now see why it was necessary to both shorten and bend the tool. It's also necessary to remove the black plastic engine cover (easy, just three torx bolts).

It's tricky to see exactly where the square receiver hole in the tensioner is, but if shine a bright flashlight towards it and look from several angles you'll eventually see it. Getting the tool in place is a little tricky, but not maddening.

:nono; Beware, this is where a slip can mash your fingers!

Once you're sure it's securely in place, you lift the tool handle up. You'll be able to then slip the belt off the alternator, which will liberate if from everything else.

As the Haynes guides says, "Installation is the reverse of removal" :D. But not quite.

Here's the view from below with the new belt in place:

Image


The front of the car is to the left, the main pulley is on the right, there's a part of the a/c pulley on the left, and the idler pulley is in the middle, above the belt. You can also see the tool sticking into the tensioner.

I found that it was reasonably easy to put the belt in place by aligning if from below while someone held the tensioner pulley, then I fit it under the idler and over the alternator from above. After checking to see that everything was lined up, you can allow the tensioner to go back to its resting position and remove the tool. Check out everything once more from above and below.

Start the car before you button everything up, and reinspect to make sure there's nothing out of place.

Reattach the fender liner and replace the engine cover and you're done! Go for a short test drive, just to make sure there are no problems.
 
#3 · (Edited)
CAVEATS and Misc

The Idler Pulley

On ng900s, very few belts would fail on their own, usually they were chewed up when the idler pulley bearings wore out. For ng's replacement of the idler pulley was recommended whenever the belt was changed by many SC members. Unfortunately, the idler pulley doesn't seem to be replaceable on it's own on a 9-3. The entire tensioner would need to be replaced. You can see the bolt that holds it in place from below, but I suspect it's hard to replace the tensioner. I gave the idler pulley a spin by hand to make sure it wasn't binding or wobbling, and left it at that.

About Belt Size

I bought the recommended replacement belt from a reputable online seller. The belt I got was a Contitech 5PK 1023. The 5 PK means it has 5 ribs, the 1023 is the length in mm. The belt I took off was a Dayco 5PK 1028, which is a half cm longer. That half cm matters! I could not fit the new belt on, no matter how much we moved the tensioner :evil: . I put the old one back on, and ordered a Goodyear 5PK 1030 from Autozone online (my local didn't have anything close in stock OR in their computer.

This is the closest size I could find to the one I took off (ie 2mm longer). The part number is 4050405. I'm not sure whether the supplier just sent me the wrong belt, or whether maybe one of my pulleys was replaced with a slightly larger one at some point. The original belt was made by Dayco and had a GM part number that I couldn't read, so I doubt it. For more on Goodyear belt sizes look here:

http://www.goodyearep.com/ProductsDetail.aspx?id=3128

Image
 
#32 ·
The Idler Pulley

On ng900s, very few belts would fail on their own, usually they were chewed up when the idler pulley bearings wore out. For ng's replacement of the idler pulley was recommended whenever the belt was changed by many SC members. Unfortunately, the idler pulley doesn't seem to be replaceable on it's own on a 9-3. The entire tensioner would need to be replaced. You can see the bolt that holds it in place from below, but I suspect it's hard to replace the tensioner. I gave the idler pulley a spin by hand to make sure it wasn't binding or wobbling, and left it at that.

About Belt Size

I bought the recommended replacement belt from a reputable online seller. The belt I got was a Contitech 5PK 1023. The 5 PK means it has 5 ribs, the 1023 is the length in mm. The belt I took off was a Dayco 5PK 1028, which is a half cm longer. That half cm matters! I could not fit the new belt on, no matter how much we moved the tensioner :evil: . I put the old one back on, and ordered a Goodyear 5PK 1030 from Autozone online (my local didn't have anything close in stock OR in their computer.

This is the closest size I could find to the one I took off (ie 2mm longer). The part number is 4050405. I'm not sure whether the supplier just sent me the wrong belt, or whether maybe one of my pulleys was replaced with a slightly larger one at some point. The original belt was made by Dayco and had a GM part number that I couldn't read, so I doubt it. For more on Goodyear belt sizes look here:

http://www.goodyearep.com/ProductsDetail.aspx?id=3128

Image
I can confirm as well that the Contitech 5PK 1023 does not fit. I've had that thing in my closet for a few years and went to put it on today. No dice. I went to NAPA and gave them the Goodyear part number for the belt above and got another brand of the same size. It fit was a bit tough to put on. I also didn't have the accessory belt tool so I used a long metal rod and lowered the jack so that it put pressure on bottom of the tensioner. Not the best method but it worked. Didn't need a helper either.
 
#5 · (Edited)
robhurlburt said:
That tool seems a little silly when every other serp i have done i just used my ratchet.
It does seem silly, especially since I had to hacksaw it in half :evil: . But really there isn't enough room for a ratchet or breaker bar, the fender is just too close, plus the upper motor mount is right in the way. I definitely tried before I broke out the saw :D

Book time on this job is only 0.3 hours according to Alldata.com. Someone who didn't have to make their own tool and who had the right belt in hand can do this in way less than an hour.
 
#6 ·
JMarkert said:
It does seem silly, especially since I had to hacksaw it in half :evil: . But really there isn't enough room for a ratchet or breaker bar, the fender is just too close, plus the upper motor mount is right in the way. I definitely tried before I broke out the saw :D

Book time on this job is only 0.3 hours according to Alldata.com. Someone who didn't have to make their own tool and who had the right belt in hand can do this in way less than an hour.

I was able to do it with justa ratchet... you just have to push it over by about 1mm (literally) to get the required clearnace. Took about 20 minutes and most of that was finding those little stars to get the engine cover and airbox bolts off


Hope this solves the idle squeek
 
#7 ·
camarossguy2 said:
I was able to do it with justa ratchet... you just have to push it over by about 1mm (literally) to get the required clearnace.
Interesting - maybe my ratchet is too fat, but on my car it just wouldn't go. A ratchet (and maybe a pipe as an extension) would make the job much easier, if it works.

Obviously bending and hacksawing a serp belt tool is not very time efficient.
 
#8 ·
JMarkert said:
Interesting - maybe my ratchet is too fat, but on my car it just wouldn't go. A ratchet (and maybe a pipe as an extension) would make the job much easier, if it works.

Obviously bending and hacksawing a serp belt tool is not very time efficient.


The hard part was getting the ratchet in the right "click" to rotate it enough to release the belt. the handle of mine was to fat to move between the engine and the engine mount.
 
#10 ·
JMarkert said:
I can always rent out my custom tool :cheesy: .

So Camarossguy,did it solve the squeak? Also, I didn't take the airbox off, do you think it helped? Maybe that's why you could work the ratchet in?

Yah, no more squeek! before it sounded like and old ford and i was afraid one of the accys could have been bad, luckly the belt fixed it. I used the good year one btw.


Yes i took out the air box, helped a lot. I've been and aviation tech (A&P) for several years and worked on cars for many years and one thing i've learned is spend the extra 5 minutes to make room will save your hours.


I also left the airbox off and did a DIY CIA.. works great and was free!
 
#11 ·
i was getting some squeaking noise when the car was in drive and in really low rpm with ac on.
when i changed my belt i just removed the air box, jacked up the right side of the car, removed that cover behind the wheel, and then it got interesting :p
removed the engine mount from the serpentine belt side, carefully placed another jack under the engine, and slowly raised one side of the engine. this way i was able to use a standard wrench and i did not have to buy a special tool.
i also noticed that the squeaking noise did not come from the belt itself, but the pulley on the tensioner was with problems. (dealer confirmed this!) the ball bearings from the pulley will slowly spin on the tensioner mount instead of being secured in place, causing them to get hotter thus losing their lubrication. then the tensioner gets slightly used and so the noise starts showing. i replaced the belt and tensioner and everything worked perfectly.
 
#12 ·
bogdi1988 said:
removed the engine mount from the serpentine belt side, carefully placed another jack under the engine, and slowly raised one side of the engine. this way i was able to use a standard wrench and i did not have to buy a special tool.
Interesting - Is it hard to remove the mount?

bogdi1988 said:
i also noticed that the squeaking noise did not come from the belt itself, but the pulley on the tensioner was with problems.
This too is interesting - for the ng900's, most belt failures were a result of worn tensioner pulleys. Is it hard to replace the tensioner? I noticed that unlike ng900's, the whole tensioner needs to be replaced, rather than just the pulley.
 
#13 ·
JMarkert said:
Interesting - Is it hard to remove the mount?
Mount can be taken off fairly easy. About 2-3 screws in the chassis, and about 2-3 more in the engine. For the part of the mount that is on the engine, you can not remove the last screw, but unscrew it as much as you can and then you can twist the mount so you still have enough access.


This too is interesting - for the ng900's, most belt failures were a result of worn tensioner pulleys. Is it hard to replace the tensioner? I noticed that unlike ng900's, the whole tensioner needs to be replaced, rather than just the pulley.
Tensioner goes off easily. One screw and it is off. Be careful! If you have then engine jacked up like i did, always have somebody just hold the engine when screwing or unscrewing anything, or when tensioning the belt, and make sure to put maybe a couple of pieces of wood or something under the engine as a precaution in case that jack fails or something.
 
#15 ·
My 2 Cents on Changing the Belt

I've only changed my 04 9-3 belt once so far. Looking at the JMarkert's pic of the tensioner tool, I think it's easier to get to the tensioner from the bottom up. If someone were able to tackle the job from the top on the engine compartment, there is no need to remove the wheel well. You'd need to have small arms to do it this way.

I didn't have a proper tensioner tool and all my ratchets were too thick. I tried fabricating one per the instructions in the Haynes manual but it didn't work out as planned. I ended up using a floor jack and crow bar to prop up the tensioner from underneath. It's not "too" dangerous as long as you use "extreme" care to only lift the tensioner just enough to slip the belt off and keep your hands out of the way in case the crow bar slips.
 
#16 ·
My 2 Cents on Changing the Belt

I've only changed my 04 9-3 belt once so far. Looking at the JMarkert's pic of the tensioner tool, I think it's easier to get to the tensioner from the bottom up. If someone were able to tackle the job from the top on the engine compartment, there is no need to remove the wheel well. You'd need to have small arms to do it this way.

I didn't have a proper tensioner tool and all my ratchets were too thick. I tried fabricating one per the instructions in the Haynes manual but it didn't work out as planned. I ended up using a floor jack and crow bar to prop up the tensioner from underneath. It's not "too" dangerous as long as you use "extreme" care to only lift the tensioner just enough to slip the belt off and keep your hands out of the way in case the crow bar slips.
 
#17 ·
I'll take the plunge tomorrow. I'm also going to try to use a NAPA (Gates) belt. They gave me a longer belt that has an outside circumference of 1047, but the effective length is supposed to be 1033. 5 extra mm doesn't sound like too much, but we will see. It appears to be a thinner belt than the ContiTech from that "reputable" source. Because it's a thinner belt, I'm afraid the tensioner won't have as much... tension. Hopefully it won't be too long and slip.
 
#18 ·
i tackled this over the weekend

followed bigdi walkthrough which is excellent.i used a breaker bar and attecked it from underneath belt came off easily fell into trouble with the tensioner pulley the haynes manual is woefully lacking in detail you must must remove the engine mounts and jack the engine otherwise the is no room for work saab may be born from jets but there is no wild blue yonder for access in these cars
i also sharpie the mark on the pulley where the stub ties to the block made it much easier to center
its a two person job without a lift
thanks for this walkthrough
17 bucks for the belt and 59 for the tensioner and lots of beer money the slab stealer didnt take
engine is much quieter too
 
#19 ·
I just finished the job. For convenience, I removed the entire fender liner which gave me a nice opportunity to clean it thoroughly. Unfortunately, two of the little threads holding the fender liner broke when removing the plastic nut. To repair that, I drilled a hole and put in a screw.

To create a tool for the tensioner, I had to cut 2mm off an old ratchet with my friend the angle grinder. Then I accessed the tensioner from underneath, which was quite easy. There was no need to remove the engine support nor the air box.
 
#21 ·
2005 9-3 Linear Belt

After calling around the area and getting prices of $60-90 to replace the belt when I even have the part. (Saab oddly was one of the cheaper places at $62)

I didnt feel like paying that much for replacing the belt. I went to Harbor Freight and purchased the belt tensioner tool for $13 or so. I pulled the wheel well out and drop up on ramps.

Just like the others in this forum, I had to modify the tool slightly. First I made a couple bends near the business end of the tool (opposite of the handle). This was purely to make it easier for myself to get around the nut of the one pulley. Next, I estimated the amount of the tool that would need to be hacked off and proceeded with cutting the tool roughly in half. Try to cut just enough, otherwise you are losing the torque arm in a longer tool.

It was fairly easy to get the tool in its slot, but once it was in there, using a little bit of muscle, the belt loosened and slipped right off. Getting the new belt on was just as easy.

I backed up off the ramps and jacked up the car. This makes it much easier to replace the wheel well. Good luck!
 
#22 ·
After calling around the area and getting prices of $60-90 to replace the belt when I even have the part. (Saab oddly was one of the cheaper places at $62)
Great advice, but I wonder whether it's worth it to save the sixty two bucks. I think the tool was at least twenty, then the belt was at least fifteen, then the time to modify the tool. I'd do mine again since I'm set up, and going to the dealer is a hassle, of course, but I wonder a little about the payoff of the DIY route. Pride is worth something, of course :D.
 
#24 ·
Ah, I see. Yes, if that was just the labor, I agree. I'm sure the dealer gets another thirty for the belt itself. Still, $62 is a relative bargain, dealers usually hate to charge less than a full hour's labor for anything.

I wonder what the source of a 9-3 specific tool would be?
 
#28 ·
I had bought the 1023 and thanks to this bought a 1030. After going under the hood and looking at the space, I took it to the stealership. They couldn't get the 1030 on the car (allegedly) and put on a slightly longer one. A tick on start up from the belt is gone and I kept the 1030 as a spare.

The dealer pissed me off, but it saved me the headache of buying the tool, running into the problem with the belt and whatever else would break.
 
#29 ·
Ordered the belt from autoanything.com...$16 and installed in about 30 mins. I could do this in about 15 mins now. You do need two people however.

1. remove engine cover and airbox.

2. remove two plastic nuts from inside of inner fender and bottom two screws from front of inner fender.

3. Using anything such as 1 1/2' breaker bar or even a piece of wood press up on lower portion of tensioner arm. You do not need to use the 3/8 hole since there is a good 1/4'' of the arm that extends past the belt and wheel. Person up top just slips of belt from upper pully.

4. Pulling the inner fender out of your way remove belt from two other pullies.

5. install in reverse by first slinging around bottom pullies. Press up on tensioner arm in same manner and have "helper" slide belt over top pully and reverse.

extra tools, custom tools not needed. btw, saab uses mitsuboshi belts which are ironically the ones that can be found online the cheapest.