

I had nothing else better to do this morning so I thought i would try and find a slight rattle I had behind my dash. I did try to record the rattle while on the road but to be honest it wasn't very loud... just irritating !! I got to the cause of it but bare in mind that it does sound exagerated with the dash out !!
After stripping the dash down this is what has turned out to be the culprit.
http://uk.youtube.com/watch?v=iGcj6kecCqE
After sticking some edead around the two offending items it appears that I have cured it.
http://uk.youtube.com/watch?v=0SfuCE1uCBQ
I thought the following ‘How to’ may come in handy for any owners that may be interested in how to get to the back of their clocks to cure similar rattles. Although I set out to just rid myself of this one annoying rattle I took the opportunity to secure other things that I thought had ‘rattle potential’ while I was in there !!
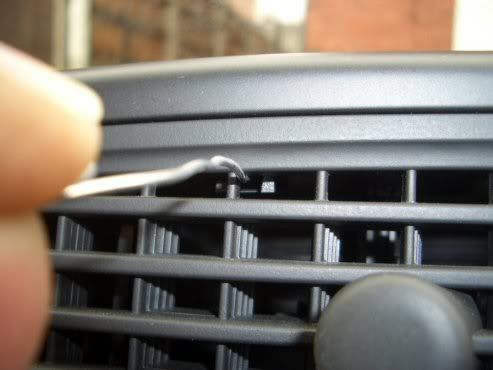
First we have to remove the centre vent. To be honest the removal of the vents is the trickiest part of the whole process.
The vents are held in place with plastic spring type lugs. I use a strong straightened out paper clip to release them. I keep a gentle pulling pressure on one of the vent knob adjusters while releasing the lugs. This slight pressure allows the vent to come out slightly and thus preventing the lug from springing back into its slot.
The pictures show the position that the ‘removal tool’ needs to be in and one of the ‘lugs’ levered out of its location. This method also applies to the side vent. BE VERY CAREFUL THAT THE VENTS DON’T COME APART WHEN YOU REMOVE THEM’. Although this has never happened to me I have read of it happening.
![Image]()
You can see from the pictures that I took my hot glue gun to the vents to prevent this happening should they ever have to come out again and also secured the parts of the vents together which also prevents the two parts from rattling. (When you get them out give them a shake and you will see what I mean).
With the vents out you can see what the lugs are like if you are going to do this for the first time.
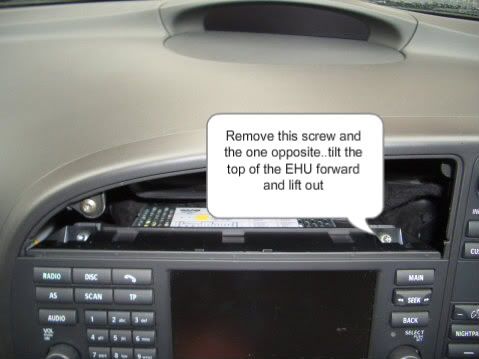
Once the vents are out you have access to the EHU which is secured with two torx screws. Unscrew them and lift the unit out a few inches to access the single connector on the back. Press the release tab and pull the connector out of the EHU and move it to a safe location.
![Image]()
The vertical column of switches to the right of the EHU is just clipped in. Put your hand to the upper rear of it and squeeze the prongs towards each other. Push it out of the dash from the top and then lift out of the dash.
![Image]()
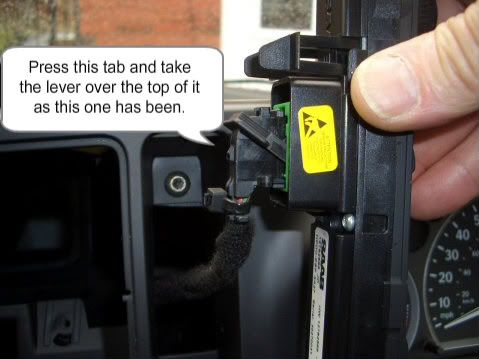
Push in the tab on the connector and push the connector lever over it. The connector will come out without any force being used.
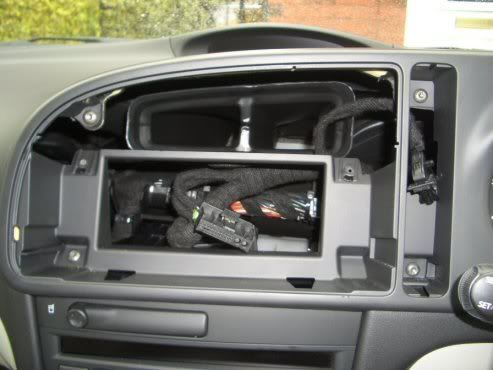
Now all the screws that secure the dash trim are visible. Unscrew them being careful not to drop any into unreachable places…this will only give you ‘another’ rattle !!!!
![Image]()
Lift the dash surround away from the dash being careful not to scratch the finish which could lead to premature ‘peeling’… we’ve all read about that…right!!
Now all we need do is remove the four torx screws securing the clocks. Once you’ve done that lift the clocks out and release the electrical connector from the rear. There is just one connector… simple.
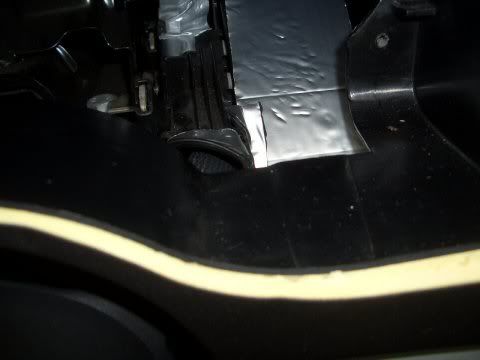
Ok now we can go sort that rattle. As you have seen on the video my rattle was between the plastic cable trunking the flat metal plate at the side of it. I used some edead that I had left over from soundproofing my boot and doors ( another ‘how to’ with pictures to be done soon. Well worth the time and effort if you plan on keeping the car and cuts down on road noise. Helps with the bass from the door speakers..blah,blah..I digress)!!
![Image]()
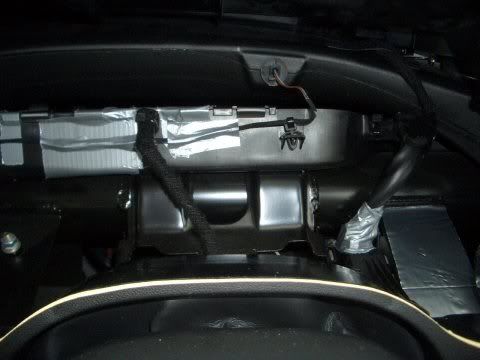
I also found that when I tapped on the top of the plastic cable trunking directly behind the clocks that it had potential to rattle.. so I used tape to secure it.along with the wires that ran in front of it.
![Image]()
Once I had quietened down the rattle I had set out to do I noticed when gently thumping the bottom of the dash that I had another rattle lower down. This was found to be a plastic cover over the top of the footwell down light.
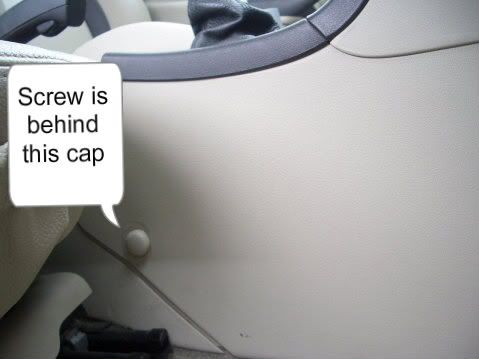
To get to it I had to remove the tunnel side panel which is held by one torx screw which is under a plastic cover. You need to put the seat as far back as you can to get to it. Remove the screw and the panel slides downwards, then backwards and out it will come.
![Image]()
I then unscrewed the cover that is directly above the pedals. This is held with two torx screws.. and the tech 2 socket needs to be removed..this just unscrews and passes through the panel.
![Image]()
The panel will now pull out and drop down… disconnect the wires to the lamp and take the panel out.
You will see a cover over the light. This is just slotted in…
I used my hot glue gun to place four blobs of glue as on the photo.
![Image]()
Now in the words of the famous Haynes manuals…. Installation is the reverse of removal !!
Wouldn't let me post all the pictures... So I'll probably do them in another post later.
Please feel free to PM with any questions and I’ll do my best to assist.
After stripping the dash down this is what has turned out to be the culprit.
http://uk.youtube.com/watch?v=iGcj6kecCqE
After sticking some edead around the two offending items it appears that I have cured it.
http://uk.youtube.com/watch?v=0SfuCE1uCBQ
I thought the following ‘How to’ may come in handy for any owners that may be interested in how to get to the back of their clocks to cure similar rattles. Although I set out to just rid myself of this one annoying rattle I took the opportunity to secure other things that I thought had ‘rattle potential’ while I was in there !!
First we have to remove the centre vent. To be honest the removal of the vents is the trickiest part of the whole process.
The vents are held in place with plastic spring type lugs. I use a strong straightened out paper clip to release them. I keep a gentle pulling pressure on one of the vent knob adjusters while releasing the lugs. This slight pressure allows the vent to come out slightly and thus preventing the lug from springing back into its slot.
The pictures show the position that the ‘removal tool’ needs to be in and one of the ‘lugs’ levered out of its location. This method also applies to the side vent. BE VERY CAREFUL THAT THE VENTS DON’T COME APART WHEN YOU REMOVE THEM’. Although this has never happened to me I have read of it happening.
You can see from the pictures that I took my hot glue gun to the vents to prevent this happening should they ever have to come out again and also secured the parts of the vents together which also prevents the two parts from rattling. (When you get them out give them a shake and you will see what I mean).
With the vents out you can see what the lugs are like if you are going to do this for the first time.
Once the vents are out you have access to the EHU which is secured with two torx screws. Unscrew them and lift the unit out a few inches to access the single connector on the back. Press the release tab and pull the connector out of the EHU and move it to a safe location.
The vertical column of switches to the right of the EHU is just clipped in. Put your hand to the upper rear of it and squeeze the prongs towards each other. Push it out of the dash from the top and then lift out of the dash.
Push in the tab on the connector and push the connector lever over it. The connector will come out without any force being used.
Now all the screws that secure the dash trim are visible. Unscrew them being careful not to drop any into unreachable places…this will only give you ‘another’ rattle !!!!
Lift the dash surround away from the dash being careful not to scratch the finish which could lead to premature ‘peeling’… we’ve all read about that…right!!
Now all we need do is remove the four torx screws securing the clocks. Once you’ve done that lift the clocks out and release the electrical connector from the rear. There is just one connector… simple.
Ok now we can go sort that rattle. As you have seen on the video my rattle was between the plastic cable trunking the flat metal plate at the side of it. I used some edead that I had left over from soundproofing my boot and doors ( another ‘how to’ with pictures to be done soon. Well worth the time and effort if you plan on keeping the car and cuts down on road noise. Helps with the bass from the door speakers..blah,blah..I digress)!!
I also found that when I tapped on the top of the plastic cable trunking directly behind the clocks that it had potential to rattle.. so I used tape to secure it.along with the wires that ran in front of it.
Once I had quietened down the rattle I had set out to do I noticed when gently thumping the bottom of the dash that I had another rattle lower down. This was found to be a plastic cover over the top of the footwell down light.
To get to it I had to remove the tunnel side panel which is held by one torx screw which is under a plastic cover. You need to put the seat as far back as you can to get to it. Remove the screw and the panel slides downwards, then backwards and out it will come.
I then unscrewed the cover that is directly above the pedals. This is held with two torx screws.. and the tech 2 socket needs to be removed..this just unscrews and passes through the panel.

The panel will now pull out and drop down… disconnect the wires to the lamp and take the panel out.
You will see a cover over the light. This is just slotted in…
I used my hot glue gun to place four blobs of glue as on the photo.

Now in the words of the famous Haynes manuals…. Installation is the reverse of removal !!
Wouldn't let me post all the pictures... So I'll probably do them in another post later.
Please feel free to PM with any questions and I’ll do my best to assist.


